Apple HomeKit for Nest, Logitech Harmony Hub, etc.
Ever want to use Siri or the iOS Home app to control your Nest thermostat (https://nest.com/thermostat/) or Logitech Harmony Hub (http://www.logitech.com/en-us/product/harmony-hub)?
At the time of writing, those products do not come with built-in HomeKit support but they do have APIs for 3rd party developers.
Until those products get updated to work with HomeKit directly, there’s a 3rd party solution out there called Homebridge (https://github.com/nfarina/homebridge) where you set up an Apple HomeKit bridge and then install plug-ins for those HomeKit-incompatible devices:
- Homebridge Nest (https://www.npmjs.com/package/homebridge-nest)
- Homebridge Harmony Hub (https://www.npmjs.com/package/homebridge-harmonyhub)
The Nest plug-in can:
- Set the target temperature
- Read the target temperature (what the temperature will eventually become)
- Read the current temperature (what the temperature is right now)
- Read the current humidity
The Harmony Hub plug-in can:
- Turn on an activity (hubs have activities that act like toggle switch accessories so if a hub as 2 activities and you are currently on one activity, turning on another activity will simply switch to that other activity)
- Turn off an activity (exactly the same pressing the Off button on the remote regardless of whether that activity is the current activity)
Setting up Homebridge involves a financial commitment (you need hardware to run it like an always-on computer, a Docker-compatible NAS, or other device) and there’s no guarantees that Homebridge will work for your exact home devices or whether it will keep working for you in the future (the software is free after all) so consider this may just be a toy. I chose the NAS-based approach because I had other reasons to buy that hardware. For a long term solution, you should ask the companies that make your favorite HomeKit-incompatible devices to add support for HomeKit or simply stop buying the incompatible products and instead support companies making products that do support HomeKit.
Initial Setup
Get a device that can run Docker. For example, some Synology NAS (network attached storage) models are capable of running Docker. Go to https://www.synology.com/en-us/dsm/app_packages/Docker to see a list of compatible devices, e.g. the DS216+II ($300) and be sure to get disks to put into the NAS too (2x$231 for WD Red 6TB NAS-grade disks). Homebridge takes up hardly any space at all so 6TB disks might be overkill for you unless you are using this for other NAS purposes like backups.
Connect to your Synology NAS DSM (DiskStation manager) using your browser (refer to your Synology setup instructions for how to do this, e.g. a QuickConnect URL).
Open the DSM Control Panel – Hardware & Power – HDD Hibernation and turn off any hibernation. I was experiencing Docker mysteriously deleting my Homebridge containers without any explanation (no log messages) until I cam across someone online suggesting to disable hibernation. Once disabling it, I no longer experienced this daily mystery.
Open the DSM Package Center.
Search for Docker and install it. If Docker is not found, then this Synology doesn’t support running Docker.
Open the DSM Control Panel – Shared Folders.
Create a shared folder named docker.
From the DSM Main Menu, open Docker.
From Docker’s Registry tab, search for the image marcoraddatz-synology-homebridge, select it, and click Download.
Using your computer, mount the docker shared folder, e.g. using the macOS Finder – Go – Connect to Server and then specify afp://yoursynologyname.local and then select the docker share.
Create a folder named homebridge in the docker share.
In this new homebridge folder, create a text file named install.sh (a shell script) using a pure text editor such as TextWrangler (you cannot use a rich text editor like TextEdit).
The contents of install.sh should be like the following (this is where you identify which Homebridge plug-ins you want to use):
#!/bin/sh

npm install -g homebridge-harmonyhub
npm install -g homebridge-nest
npm install -g homebridge-synology
In that same homebridge folder of the docker share, create another text file named config.json (JSON has a specific syntax so you need to be careful about commas, braces, etc.–you may find a JSON validator to help you catch syntax errors).
The contents of config.json should be something like the following (don’t worry about changing the contents of it just yet, we will edit that later and leave it like this for now):
{
  "bridge": {
    "name": "Homebridge",
    "username": "CC:22:33:11:EE:77",
    "port": 51825,
    "pin": "031-45-154"
  },

  "description": "This is an example configuration file with all supported devices. You can use this as a template for creating your own configuration file containing devices you actually own.",

  "platforms": [
    {
      "platform": "Nest",
      "token" : "",
      "clientId": "product-id-eventually-goes-here",
      "clientSecret": "ProductSecretEventuallyGoesHere",
      "code": "PINCODETODO",
      "username": "yournestaccountname@yourmail.com",
      "password": "yournestaccountpassword"
    },
    {
      "platform": "HarmonyHub",
      "name": "Harmony Hub"
    }
  ],

  "accessories": [
  ]
}
Go back to your web browser where you have loaded your Synology DSM. In the Docker app, click on the Image tab. Select the Homebridge row and click Launch to create a container. Click Advanced Settings. Go to the Volume tab – Add Folder and select docker – homebridge. This will prompt you for a Mount path which should be set to /root/.homebridge (essentially an otherwise hidden folder alias). Go to the Network tab and check the Use the same network as Docker host option. Click OK on the Advanced Settings dialog then Next then Apply.
Go to the Docker Container tab to see the container we launched. This is where you can start, stop, or restart your Homebridge. You can also see a log of activity (in case of errors) by selecting the container’s row and then clicking on Details – Log (it doesn’t auto-update so you may need to click the reload icon in the bottom-right corner if you are expecting more text to be logged).
If the Homebridge container is currently running, either click the toggle switch to turn off or select the container row and then click Action – Stop.
Let’s go back to your config.json file in the docker share to finalize the settings:
Notice the platforms array has a series of comma-separated objects indicated with { and }. If you are not using a particular Homebridge plug-in, delete the corresponding platform entry (remember to make sure your JSON is still valid).
The Harmony Hub platform is pretty much automatic so no tweaking necessary.
If you are going to use the Nest plug-in, there is a bit of a process you need to complete to make sure that configuration is correct for your specific Nest thermostat (these steps were adapted from the plug-in’s own setup instructions), e.g.:
- Go to https://developer.nest.com
- Choose Sign In
- Use your normal Nest account to sign in
- Fill in you info in ‘Step 1’
- In ‘Step 2’ set:
- Company Name: HomeBridge-Nest
- Company URL: https://github.com/kraigm/homebridge-nest
- Country: [Your Country]
- Size of Company: Individual
- Then read and agree to the terms and submit
- Go to Products and create a new product
- Fill in:
- Product Name: HomeBridge
- Description: Open source project to provide HomeKit integration
- Categories: HomeAutomation
- Support URL: https://github.com/kraigm/homebridge-nest
- Redirect URL: [LEAVE BLANK]
- Permissions (minimum):
- Enable Thermostat with read/write v6
- Enable Away with read/write v2
- Enable Smoke+CO alarm with read v4 (if you ever might want Nest Protect)
- Enable Camera with read v2 (if you ever might want Nest Cam, motion detection only)
- Now you should have a product. Now locate the Keys section on the right of your product’s page
- Copy the Product ID to your Homebridge config.json as the clientId in the Nest config
- Copy the Product Secret to your Homebridge config.json as the clientSecret in the Nest config
- Navigate to the Authorization URL
- Accept the terms and copy the Pin Code to your Homebridge config.json as the code in the Nest config
- Run Homebridge once (do not include the token in the config at this time; leave it blank) and you should find a log message (Docker – Container – Homebridge – Details – Log) that says something like “CODE IS ONLY VALID ONCE! Update config to use {‘token’:’c.5ABsTpo88k5yfNIxZlh…’} instead.” Copy that exact token value to your Homebridge config.json as the token in the Nest config. If you do not do this then the container will periodically crash even though you might otherwise think your Nest is working properly.
- Restart Homebridge and it should succeed with the new token.
After that you will be done with the Nest config. If the token is working correctly, you no longer need the other three configs (clientId, clientSecret, and code) nor the original username and password from the legacy system (but you can keep them around if you wish, they will be ignored).
Connect Homebridge to HomeKit
Using your iOS device, open the built-in Home app.
Tap on the Rooms tab, swipe to the Default Room, tap the + button, and tap Add Accessory.
If Docker is successfully set up for Homebridge, a button named Homebridge will appear. Tap on it.
You may get a dialog asking you to Add Anyway then tap on Enter Code Manually.
Type in the bridge pin from the config.json file to confirm the pairing.
You will then see a series of Accessory confirmations. Since you might have multiple Harmony Hubs, it can be difficult to identify which switch corresponds to which Hub so for now, you can just keep tapping on Next to have them all added into the Default Room or an assumed room. If you don’t already have rooms set up, now is a good time to create a room for every room where your devices are located (e.g. Living Room, Family Room, Bedroom, etc.).
For each accessory, long-press the accessory icon to interact with it or change Details.
For the Nest Thermostat, be careful not to accidentally turn on the Air Conditioner mode in the winter time (keep it on Heat otherwise you might damage your AC equipment). In the details screen, I renamed mine to be just Nest and changed its location to be my Living Room. Examples of things you can say to Siri:
- What is the temperature in the living room?
- Set the living room temperature to 70 degrees
- What is the setting for the living room Nest?
- Set the Nest to 72 degrees
- What is the humidity in the Living Room?
- Turn down the temperature
- Turn up the temperature by 2 degrees
Note that asking What is the temperature? is regarding the outside temperature via The Weather Channel, not your Nest’s temperature.
For the Harmony Hub activities, I move them to the appropriate room (try toggling them to confirm locations) and then instead of having accessory names like Watch TV, name them as the device name considering you will eventually be using Siri to Turn on/off the [Room Name] [Device Name].
If you want to create HomeKit scenes that change multiple devices at the same time, you may need to use a 3rd party iOS app like Home (https://itunes.apple.com/us/app/home-smart-home-automation/id995994352?mt=8). With Siri you can then say Set Theater or Good morning. Most scenes need to be triggered by saying Set [Scene Name] but there are 4 special scene names that don’t require the Set prefix:
- Good morning
- Good night
- I’m home
- I’m leaving
Siri struggles with some scene names so you may need to play with the names. Some names I frequently use are Normal (standard light setting), Master night light (a dim setting for the bathroom in the evening), Couch off (Turn off the lights above the couch), Movie lights (really dim and some lights off to prevent screen glare), Intermission (brightness between Normal and Movie lights–not too dark and not too jarringly bright for getting up during a movie).
Examples of scenes that I’ve set up to work with my Harmony Hubs include:
- Theater – sets the same lights as my Movie lights scene but also turns on the Apple TV Harmony Hub activity. It would be awesome to have this lower a blackout window shade too.
- Good Morning – sets the master bath lights to normal brightness and turns on the bedroom TV (I haven’t yet set up a special Harmony Hub activity yet that will also change the channel to my favorite morning news but in theory Harmony’s activity setup allows such a macro).
Limitations
- As far as I can tell, the Synology Docker app doesn’t have any GUI setting to make your Homebridge container start automatically when your Synology restarts. There might be some command line mechanisms but I don’t know how that interacts with configurations made via the UI. Hopefully a future Synology Docker software update fixes this.
- The Harmony Hub plug-in doesn’t have a way to trigger specific remote buttons; you have to use the Harmony activity setup tool to create new activities if you want to tack on additional button presses.
Troubleshooting
- First thing to check is the Synology DSM – Docker – Container – Details – Log for error messages.
- Look for tips on the Homebridge website or plug-in website (some errors are listed as known and can be ignored).
- Search the web for other ideas.
Adding Apple Watch to a MAF App
Here are some steps for adding iOS 9+ Apple Watch OS 2+ support to an Oracle Mobile Application Framework (MAF) App.
Set up and deploy the MAF app
1. Download and unzip the following Cordova plugin zip from git: https://github.com/leecrossley/cordova-plugin-apple-watch/archive/master.zip (more info at https://github.com/leecrossley/cordova-plugin-apple-watch)
2. Using JDeveloper, create a MAF app and select the unzipped plugin folder in the maf-application.xml (in the “Additional Plugins” section)
3. Create an AMX page (using amx:clientListener in amx:commandButtons to trigger the plugin APIs); this can be just placeholder content for now
4. Deploy the app to the simulator to generate an Xcode application in the JDev app’s “deploy” folder. We will be editing this generated output from the deploy folder so be careful to note that generated output will be lost if you re-deploy from JDev in the future.
5. Quit JDev
Prepare Xcode
6. Open the Xcode project from the MAF app’s deploy folder (Oracle_ADFmc_Container_Template.xcodeproj).
7. Create a new Target – WatchKit App (ensure “Notification Scene”, “Glance Scene”, and “Complication” are checked and activate the new scheme when prompted)
8. Open the Interface.storyboard from the newly-added target
Create the Watch App’s UI
9. Drag a Label from the Object Library onto the Interface Controller Scene’s Interface Controller and use the Attributes Inspector to style the label if desired (e.g. Size – Width and Height = Relative to Container and value 0.7)
Drag a Button from the Object Library onto the same scene below that Label.
10. From the watch extension folder in Xcode, open the InterfaceController.swift file in a new window or use the “ven diagram” (assistant editor) icon for split-screen editing.
11. While holding down the Control key, drag the label from the scene hierarchy that was added in step 9 into the class of step 10 to generate an Outlet variable:
@IBOutlet weak var helloWorldLabel: WKInterfaceLabel!
Repeat with the button to generate:
@IBOutlet weak var someButton: WKInterfaceButton!
and then also type in:
@IBAction func someButtonAction()
{
  print("someButtonAction")
}
Finally, Control-drag the hollow circle from the someButtonAction margin onto the button in the scene to connect the action to that button.
12. If you want to create a page-based app, drag additional Interface Controller scenes from the Object Library and connect them via Control-dragging the seque line from the selected scene to the new scene (and then in the seque panel, choose “next page” as the relationship)
Make live data to test
13. In the InterfaceController.swift file, add this temporary code to the end of the awakeWithContext method so we can verify the app functions before connecting it to the MAF app via the Cordova plugin:
// Create a timer to refresh the time every second
let timer = NSTimer.scheduledTimerWithTimeInterval(1.0, target: self, selector: #selector(InterfaceController.updateLabel), userInfo: nil, repeats: true)
 timer.fire()
14. Add this additional function to the class to support the temproary timer code:
func updateLabel()
{
  print("updateLabel")
  let time = NSDate()
  let formatter = NSDateFormatter()
  let timeZone = NSTimeZone(name: "UTC")
  formatter.timeZone = timeZone
  formatter.dateFormat = "h:mm:ss a"
  var formattedString = formatter.stringFromDate(time)
  formattedString = formattedString.stringByReplacingOccurrencesOfString(" p", withString: "PM", options: [], range: nil)
  formattedString = formattedString.stringByReplacingOccurrencesOfString(" a", withString: "AM", options: [], range: nil)
  self.helloWorldLabel?.setText("UTC \(formattedString)")
}
15. Run the WatchKit target to verify everything was created properly.
16. Stop the app in Xcode
Configure the Cordova Plugin APIs and, in turn, MMWormhole
17. Go to Oracle_ADFmc_Container_Template – all 3 targets: the phone, the Watch Target, and the Watch Extension Target – Capabilities – App Groups and turn it on. Ensure that all 3 checkmarks are checked. Your Xcode identity and Bundle Identifier must allow you to use app groups. This is a requirement of the MMWormhole framework (you’ll get an error and crash when running the app if you don’t do this). The “App Groups” must have an entry with a value that you will later use in your Swift code (step 23) and JavaScript code (step 25).
18. There is no need to manually add MMWormhole (https://github.com/mutualmobile/MMWormhole) to the Xcode project because the Cordova extension already has it included. However, you will need to select all of the MMWormhole*.m files in Xcode from the Plugins folder and then add (checkbox) target membership for the watch extension.
19. By default, the watch extension will not be able to see those MMWormhole Objective-C objects so you need to create a bridging header. Go to Oracle_ADFmc_Container_Template – Choose the Watch Target Extension – Build Settings – Swift Compiler Code Generation – Objective-C Bridging Header and specify the value:
Oracle_ADFmc_Container_Template/Plugins/Bridging-Header.h
20. In the Navigator, select the Plugins folder and choose File – New – File – Header File and name it Bridging-Header.h and choose the Watch Target Extension target and then use this as the file content:
#import "MMWormhole.h"
#import "MMWormholeSession.h"
21. In the watch extension InterfaceController.swift file, comment out the existing 2 lines for the timer in the awakeWithContext method (from step 13).
22. Add the following to the awakeWithContext method of the watch extension InterfaceController.swift file:
print("awakeWithContext")
let watchConnectivityListeningWormhole = MMWormholeSession.sharedListeningSession()
watchConnectivityListeningWormhole.activateSessionListening()
watchConnectivityListeningWormhole.listenForMessageWithIdentifier("from_phone_queue", listener:
{
  (messageObject) -> Void in
    if let message: AnyObject = messageObject
    {
      print("from_phone_queue")
      // handle your message here
      let messageValue: String! = message.objectForKey("selectionString") as! String
      self.helloWorldLabel?.setText("Phone \(messageValue)")
    }
})
23. Add this to the someButtonAction method of the watch extension InterfaceController.swift file:
// Make sure this appGroupId value is
// specified in the App Groups config from
// step #17
let appGroupId = "group.com.yourfoo.yourbar"
let wormhole = MMWormhole(applicationGroupIdentifier: appGroupId, optionalDirectory: nil, transitingType: .SessionContext)
let diceRoll = Int(arc4random_uniform(6) + 1) // 1 through 6
wormhole.passMessageObject("rolled \(diceRoll)", identifier: "from_watch_queue")
24. Clean then build to make sure the MMWormhole objects compile, otherwise the above steps need to be revisited.
25. Edit the app’s AMX page so that it has these components to interact with the Cordova plugin APIs:
<amx:verbatim id="v1">
<![CDATA[
window.handleMessageFromWatch = function(msg)
{
  console.log("handleMessageFromWatch");
  var outputTextElement =
    document.getElementById("ot2");
  if (!outputTextElement)
    console.log("Unable to find ot2");
  outputTextElement.textContent =
    "Watch " + msg;
};

window.handleAWInit = function(clientEvent)
{
  console.log("handleAWInit");
  var appGroupId = "group.com.yourfoo.yourbar";
  var queueName = "from_watch_queue";
  applewatch.init(
  function successHandler(appGroupId)
  {
    console.log("init Success", appGroupId);
  },
  function errorHandler(foo)
  {
    console.log("init Failure", foo);
  },
  appGroupId);

  applewatch.addListener(
    queueName,
    window.handleMessageFromWatch);
};

window.handleAWSendMessage = function(clientEvent)
{
  console.log("handleAWSendMessage");
  // The value of queueName must match a value
  // used in a corresponding listener in Swift
  // or Objective-C within the watch app using
  // the method
  // MMWormhole.listenForMessageWithIdentifier
  // in order for the watch to receive the
  // sent message.
  var diceRoll = // 1 through 6
    Math.floor(Math.random() * (7 - 1)) + 1;
  var message = "rolled " + diceRoll;
  var queueName = "from_phone_queue";
  applewatch.sendMessage(
    message,
    queueName,
    function successHandler(foo)
    {
      console.log("send Success", foo);
    },
    function errorHandler(foo)
    {
      console.log("send Failure", foo);
    });
};
]]>
</amx:verbatim>
<amx:commandButton id="cb1" text="Init">
  <amx:clientListener id="cl1" type="action"
    method="window.handleAWInit"/>
</amx:commandButton>
<amx:commandButton id="cb2" text="Send Message">
  <amx:clientListener id="cl2" type="action"
    method="window.handleAWSendMessage"/>
</amx:commandButton>
25. Run the app.
If you get an error about “The operation couldn’t be completed. (LaunchServicesError error 0.)” then look for the hidden error details in this file:
~/Library/Logs/CoreSimulator/CoreSimulator.log
In the phone app, click “Init” then “Send Message” to see a message appear in the label in the watch app. In the watch app, click the button to see a message appear in the phone app.
Final Notes
Remember that you are working in the deploy folder of JDeveloper so the next time you deploy, you’ll lose all your edits to the Xcode project. While this process involves editing files of the “deploy” folder of the MAF app, you’ll need to take careful notes on what changes you make in the deployed folder in case you need to re-deploy in the future (and you will need to) since that would require you to perform these steps again. Perhaps there is some way to bundle all the WatchKit content into a Cordova plugin so you could completely avoid having to mess around with the deploy folder (I have not researched this but if you have an have a blog post to share with detailed instructions, please let me know so I can add a link to it in this post).
A real app wouldn’t expose an “init” button to the user so you’d want to move that init call into a “showpagecomplete” handler like the one seen in the MAF developer guide. Typically a JavaScript feature include file would be where this code would go (just like the custom component code seen in the CompGallery public sample app).
HTML Layout Direction
Not every language uses a layout direction of left-to-right (LTR). Some use right-to-left (RTL). This is also known as the “reading direction” or “writing direction”.
At this time, browsers do not automatically apply dir=”ltr” nor dir=”rtl” to the HTML element for the appropriate layout direction. Adding this will change things like HTML tables re-ordering their cells horizontally and can be used in CSS files to apply alternative background images, flipped padding, margins, etc. using CSS selectors like this:
.foo {
  position: absolute;
  top: 10px;
}
html[dir=ltr] .foo {
  left: 10px;
}
html[dir=rtl] .foo {
  right: 10px;
}
There is no HTML5 API to to use the layout direction that comes from system settings. Strangely this HTML5 doc tells developers that they must manually add the direction even though in my opinion, the default should be that it comes from the system settings:
http://www.w3.org/International/questions/qa-html-dir
There is a dir=”auto” option:
http://www.w3.org/International/tests/repo/results/the-dir-attribute-auto#dirauto
but it has a few issues:
- Microsoft doesn’t support it.
- This is dependent on your page’s content instead of the system settings.
- This will prevent you from making CSS attribute selectors that resolve to “ltr” and “rtl” (it’ll be “auto” instead which defeats the purpose). There is a proposed CSS4 :dir(…) pseudo-class which would resolve auto to “ltr” and “rtl” but it is currently experimental and browser support is very weak.
Android 4.2 added support for right-to-left (RTL) layout:
http://android-developers.blogspot.com/2013/03/native-rtl-support-in-android-42.html
iOS also has its own mechanism for this:
https://developer.apple.com/library/ios/documentation/MacOSX/Conceptual/BPInternational/SupportingRight-To-LeftLanguages/SupportingRight-To-LeftLanguages.html
I was not able to find any Microsoft documentation that says whether UWP has anything equivalent to Android and iOS.
Unfortunately these disparate mechanisms are not abstracted into a unified, built-in Cordova API, the Cordova globalization plug-in, nor from what I can tell, any 3rd party plug-in.
This means you’ll either have to write your own Cordova plug-in using platform-specific code or alternatively add your own JavaScript code that uses the locale’s language code to determine whether you need to add dir=”ltr” or dir=”rtl” on your page’s HTML element.
Here is some sample JavaScript code to run when your page initially loads:
// Apply a "dir" attribute to the HTML element:
var bcp47Tag = ...; // e.g. "en-us", etc.
var scriptIndex = bcp47Tag.indexOf("-");
var language =
  bcp47Tag.substring(
    0,
    scriptIndex == -1 ? undefined : scriptIndex).toLowerCase();
if (language == "ar" || // Arabic
 language == "dv" || // Divehi
 language == "ha" || // Hausa
 language == "he" || // Hebrew
 language == "iw" || // Hebrew (legacy code)
 language == "ps" || // Pashto, Pushto
 language == "fa" || // Persian (Farsi)
 language == "ur" || // Urdu
 language == "ji" || // Yiddish (legacy code)
 language == "yi") // Yiddish
{
  document.documentElement.setAttribute("dir", "rtl");
}
else
{
  document.documentElement.setAttribute("dir", "ltr");
}
Mobile Web Inspector Developer Tools
What is a web inspector?
A web inspector is a developer tool that allows you to debug JavaScript, CSS, and HTML. You’ll usually get a file resource browser, performance monitoring tools, the ability to set code breakpoints (although in my experience breakpoints are somewhat flaky depending on which version of the mobile OS and desktop browser you are using–so often I resort to using the JavaScript “debugger” keyword to act like a breakpoint), the ability to edit HTML, and a tool for visualizing, resolving, and changing style properties–all without having to redeploy your application.
Apple introduced the ability to use the desktop Safari web inspector developer tools with iOS application WebViews and mobile Safari back in iOS 6 and Safari 6. Each new release of iOS has required that you use a corresponding version of desktop Safari so beware of this if you are planning to upgrade one device but not the other.
Google introduced the ability to use the desktop Chrome web inspector developer tools with Android application WebViews and mobile Chrome in Android 4.4 when the Chrome WebView was introduced. Many legacy Android devices are still being sold (let alone in use) but unfortunately, it is not compatible with the web inspector. For situations like that, there are some third party techniques available that require you to inject code into your application in order to send messages back and forth with a server. Those solutions have much fewer abilities than a formal web inspector. To combat this legacy issue, Google introduced a Google Play-updatable WebView in Android 5 Lollipop so your application can take advantage of new technologies even if the OS is not upgradeable.
Regardless of the platform, it is important to note that the WebView and the mobile browser are not equal. If something works in the browser, you cannot always expect it to work exactly the same way in the WebView. For example, on Android, I have seen as much as a major version number difference of 3 between the two. On iOS (prior to WKWebView), JavaScript performance was severely throttled compared to what mobile Safari had.
This post only discusses web inspectors. If you are interested in debugging Java code for your application, refer to the Oracle MAF developer guide for instructions.
Setting up your Oracle MAF Application
For iOS, there is no property to edit, you either need to use a debug deployment or use Xcode to run the application. For Android, you must edit the src/META-INF/maf.properties file of your application so that it defines:
javascript.debug.enabled=true
You can only use a web inspector with development (aka non-production) applications.
If you want to connect the web inspector before the first screen loads, will need to edit your run configuration’s “Application Arguments” to specify the following which allows you to configure how many seconds before the WebView will get populated with content.
-featureContentDelay 20
If doing this in an already-generated Xcode project, this setting goes in the Run Scheme’s “Arguments Pass On Launch” field.
Setting up your Desktop Browser
I assume that you already have your device set up for development so I won’t cover it here (e.g. Android needs development mode and USB debugging turned on via tapping the build number 7 times, iOS needs the device set up as “Use for development”, etc.).
Desktop Chrome doesn’t require anything special but I use this optional “ADB” Chrome extension as a convenience since I find it easier to click an icon vs. typing a special URL in the address bar.
Desktop Safari requires you to enable the “Develop” menu in its Advanced Preferences dialog:

Using the Safari Web Inspector
From the Safari Develop menu, your connected devices and iOS Simulator will display as submenus. Each submenu will list all of the WebViews that you are allowed to inspect (if you are not sure which one you want, a light blue highlight will appear on your device or in the simulator as you hover over each menu item).

A web inspector window will open once you select that menu item:
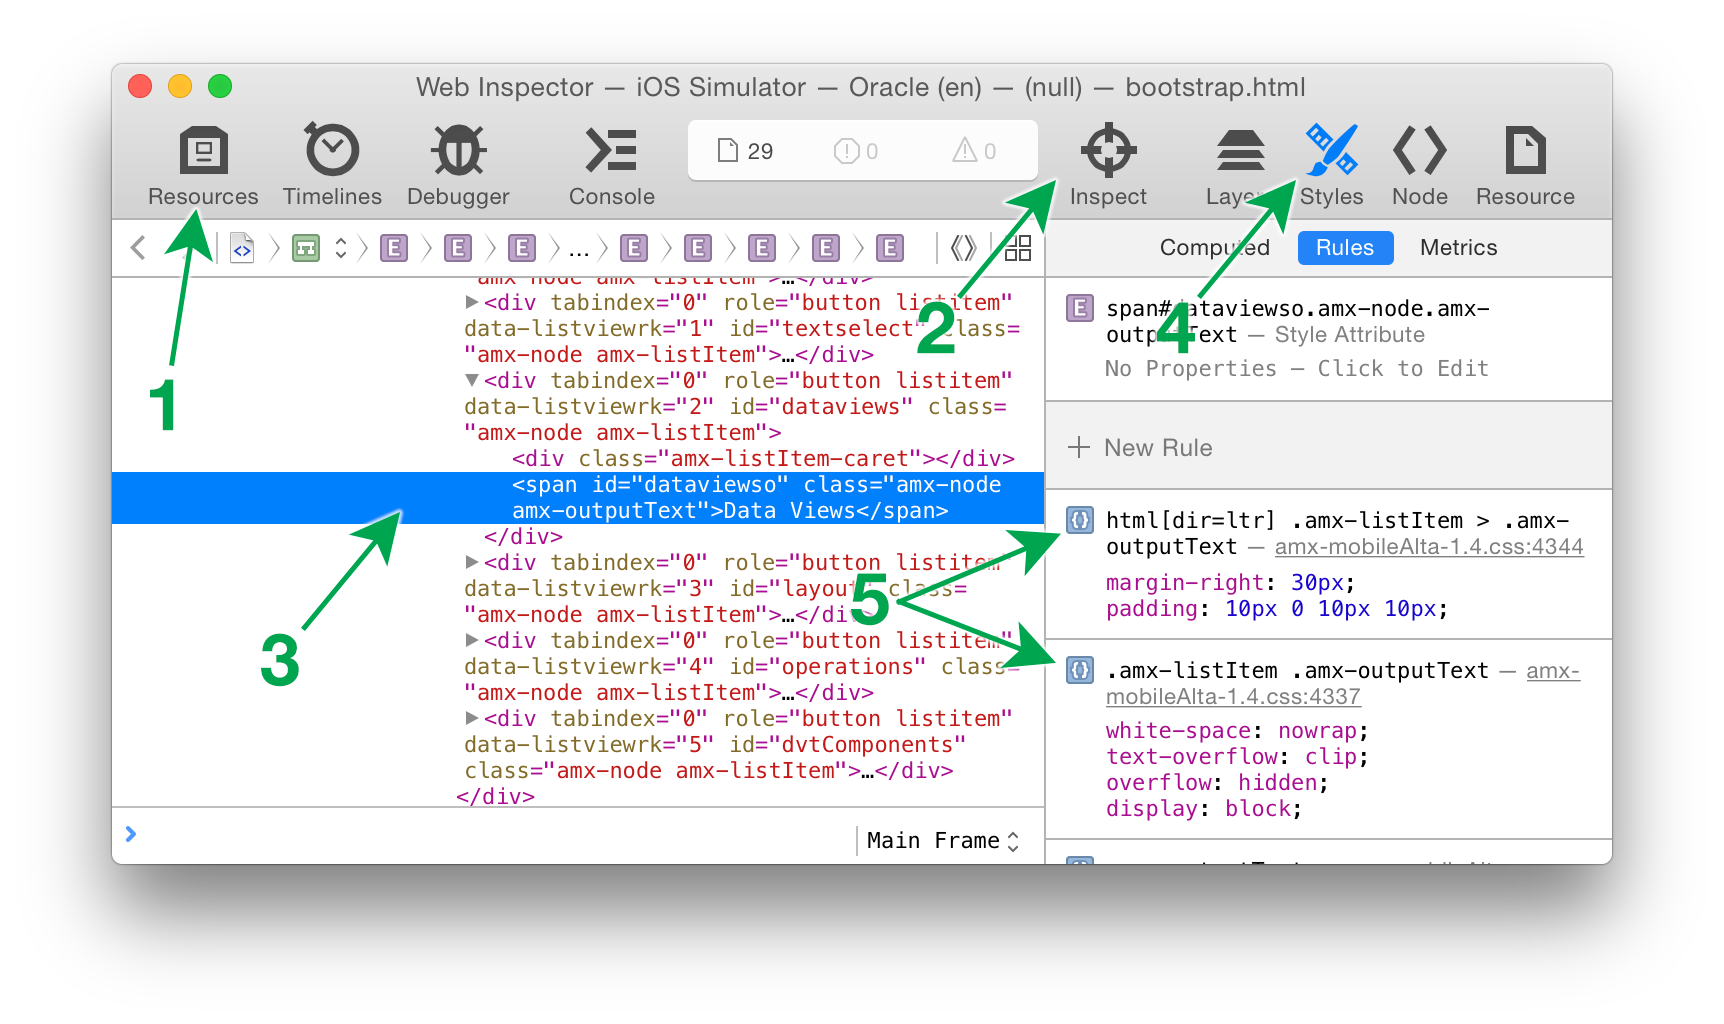
The UI varies across versions of desktop Safari but I’ll describe one here as an example. The “Resources” tab (1) is where you can browse the DOM, look at scripts, style sheets, etc. When the HTML resource is selected, the main panel will show you the DOM tree (3) which you can manually browse for an element. Alternatively, you can use the crosshairs tool (2) to click on the screen (of the actual device or the simulator) to pick an element that you want to inspect.
With an element selected, you can then use the “Styles” tab (4) of the right panel to view the element’s style properties. This will show you the exact selectors that are providing each style to the inspected element (5). This is incredibly valuable, particularly when multiple selectors are competing (a line will strike out any styles that lose out due to some other more specific selector). You can also edit those values directly or add additional properties and see the change immediately take effect on the screen. Beware changes made in the inspector do not get saved permanently into your application. If you are trying to create a custom style sheet, you’ll need to jot down elsewhere the changes you’ve made; if you leave the page or close the app, you’ll lose your changes.
Using the Chrome Web Inspector
First, visit Chrome’s “chrome://inspect/#devices” page to see a list of your connected and debuggable Android devices. Each will appear with all of the WebViews that you are able to inspect. An icon will appear with a darker gray and the WebView listed towards the top will be what is currently visible on the Android screen.
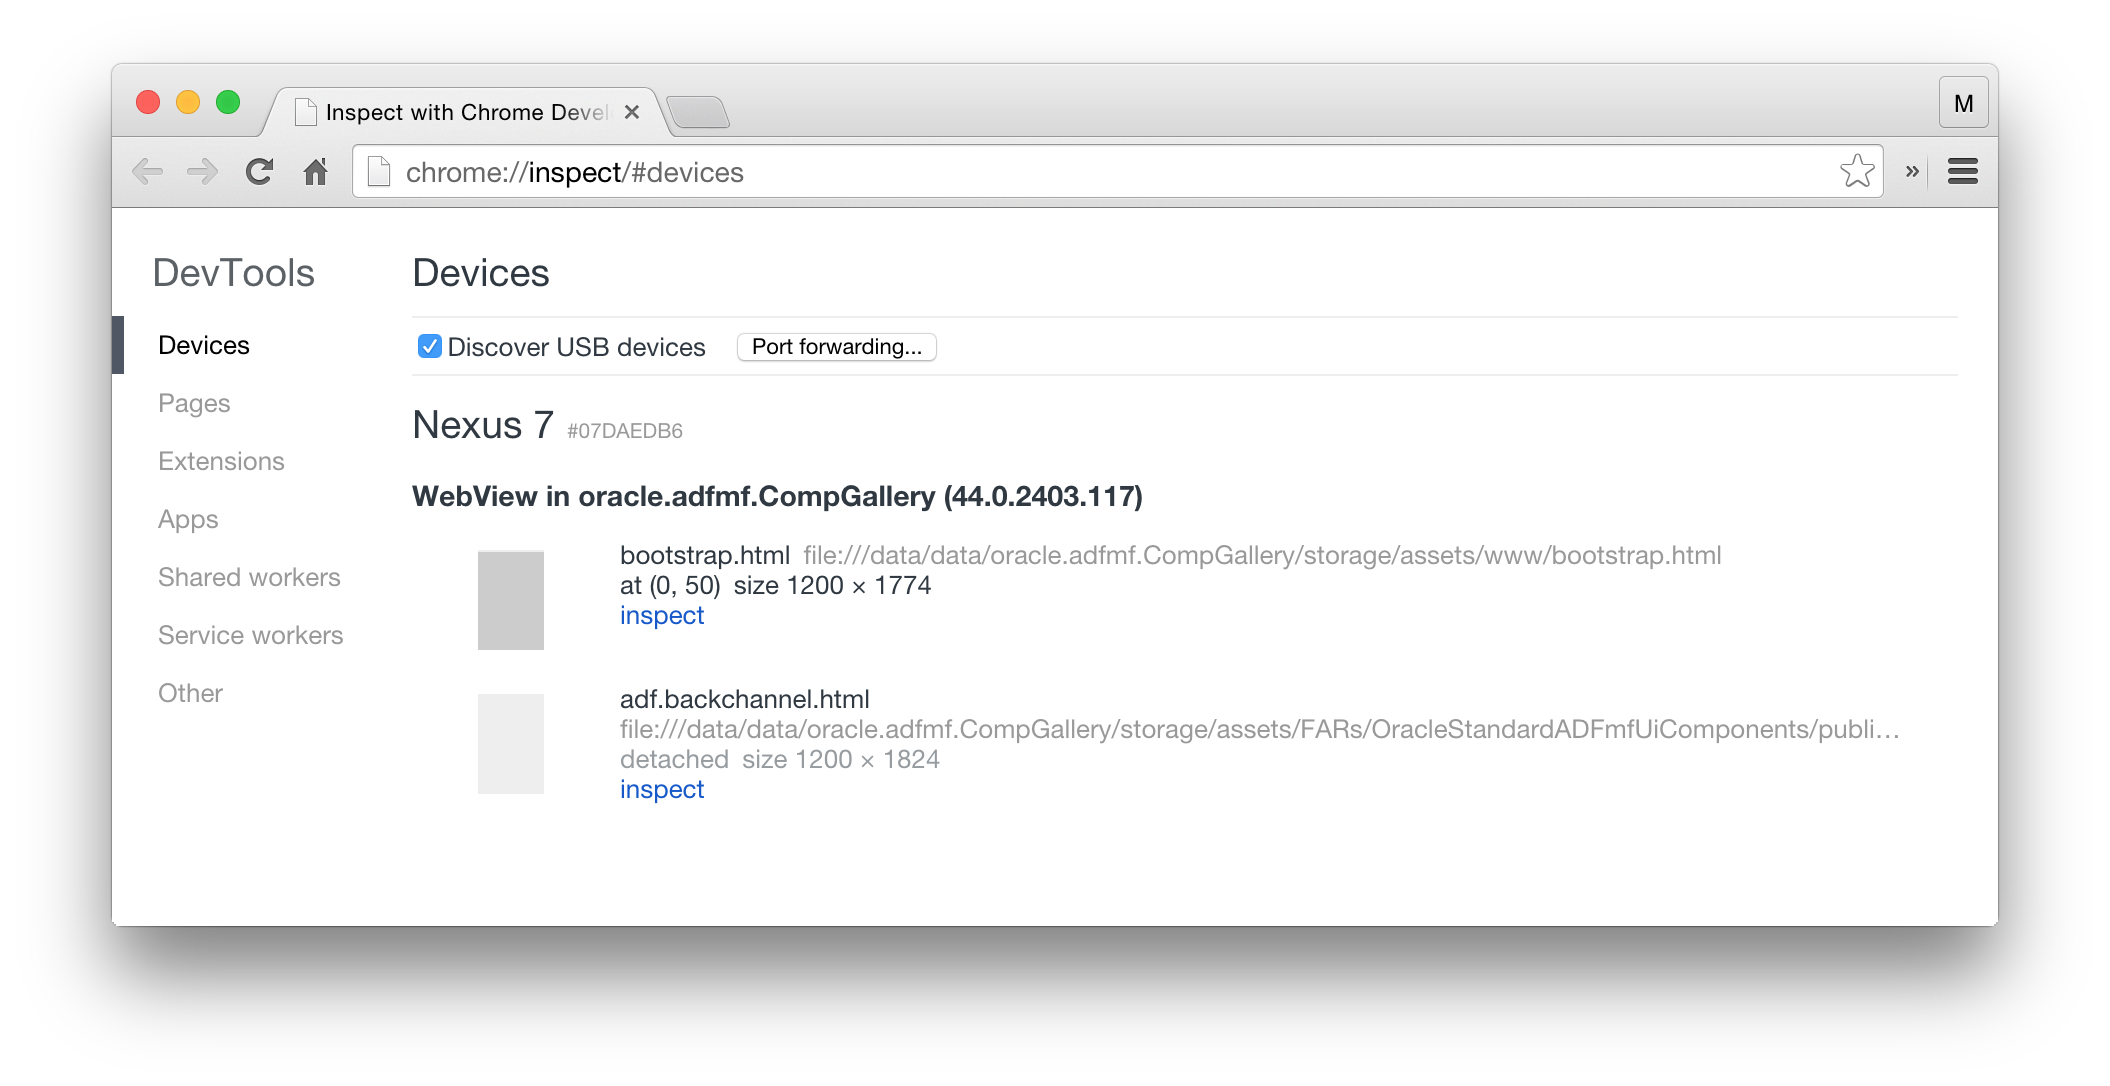
A web inspector will open once you click the “inspect” link.
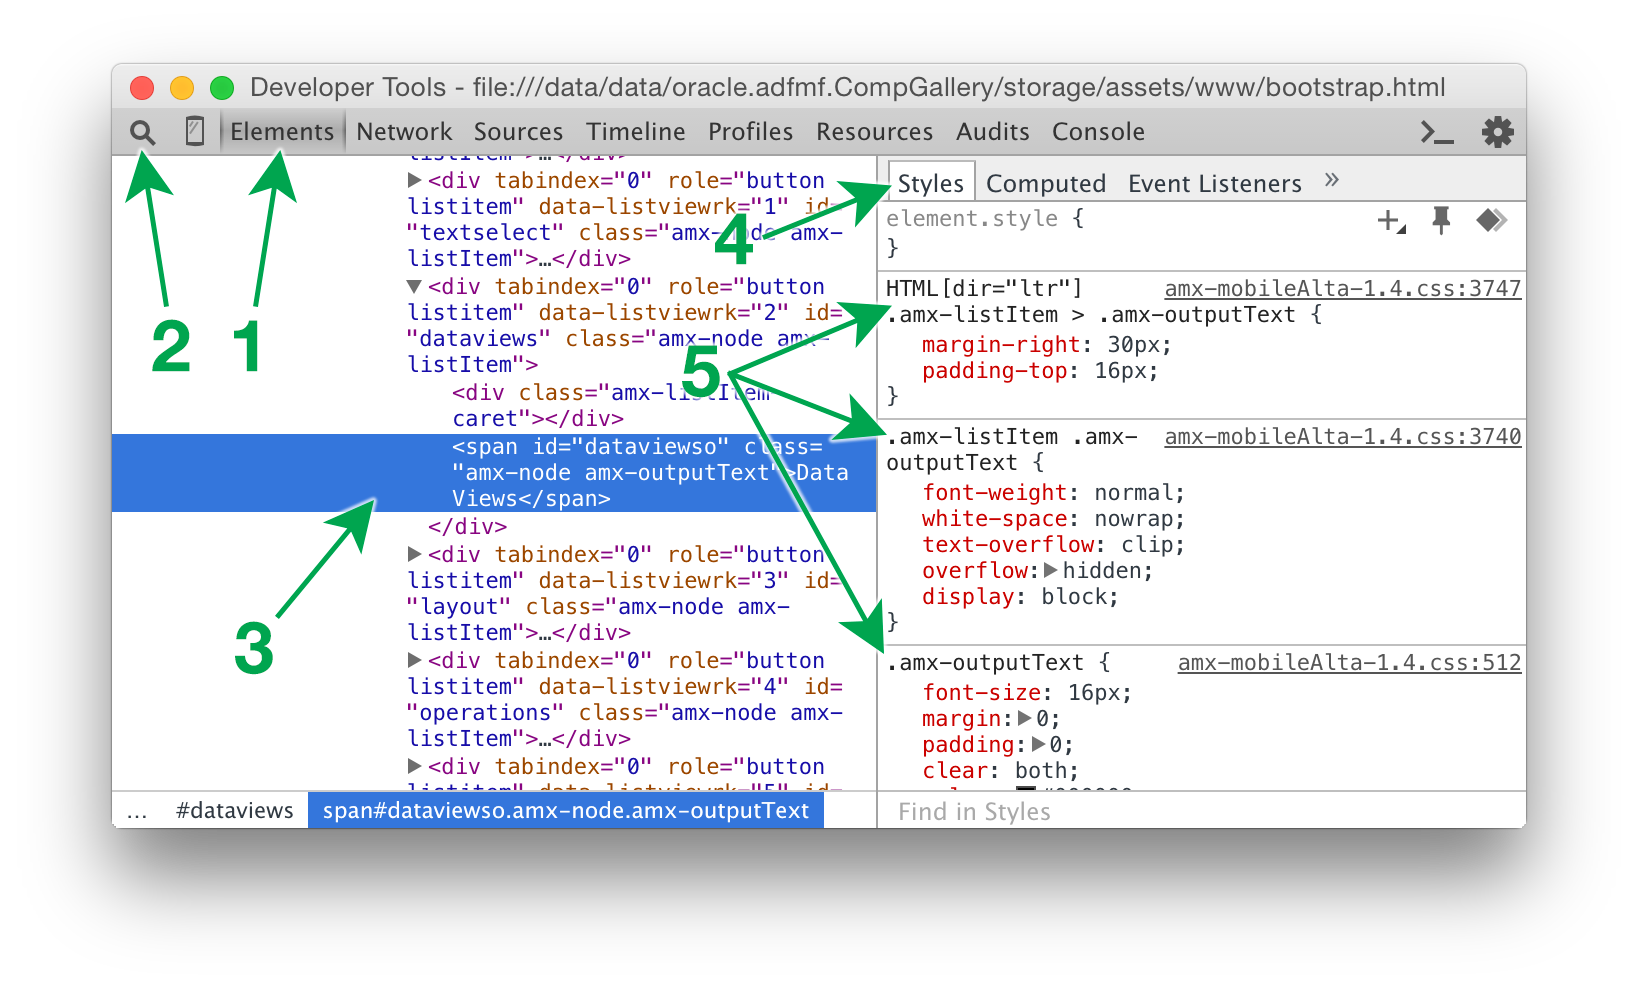
The UI varies across versions of desktop Chrome but I’ll describe one here as an example. The “Elements” tab (1) is where you can browse the DOM. The main panel will show you the DOM tree (3) which you can manually browse for an element. Alternatively, you can use the magnifying glass tool (2) to click on the screen (of the actual device or the emulator) to pick an element that you want to inspect.
With an element selected, you can then use the “Styles” tab (4) of the right panel to view the element’s style properties. This will show you the exact selectors that are providing each style to the inspected element (5). This is incredibly valuable, particularly when multiple selectors are competing (a line will strike out any styles that lose due to some other more specific selector). You can also edit those values directly or add additional properties and see the change immediately take effect on the screen. Beware changes made in the inspector do not get saved permanently into your application. If you are trying to create a custom style sheet, you’ll need to jot down elsewhere the changes you’ve made; if you leave the page or close the app, you’ll lose your changes.
Further Reading
https://github.com/phonegap/phonegap/wiki/Debugging-in-PhoneGap
Blurry Graphics in ADF Faces
Ever since Apple introduced the Retina Display in 2010, modern devices have changed to display content at twice (@2x), three times (@3x), four times (@4x) [or even fractions in-between] the resolution that we have been used to in the past.
For app developers using bitmap graphics, this can be a bit of a nightmare to support. You have to generate graphics at multiple resolutions and change your application to reference different sizes of graphics. Unless you are using photographic content, you may find it easier to deal with SVG (vector graphic) images instead.
In ADF Faces applications, there are at least 3 categories of ways to display images:
- Image components
- Components that have an image somewhere inside of it (and that don’t offer a style attribute explicitly for that image)
- CSS background-image styles
SVG
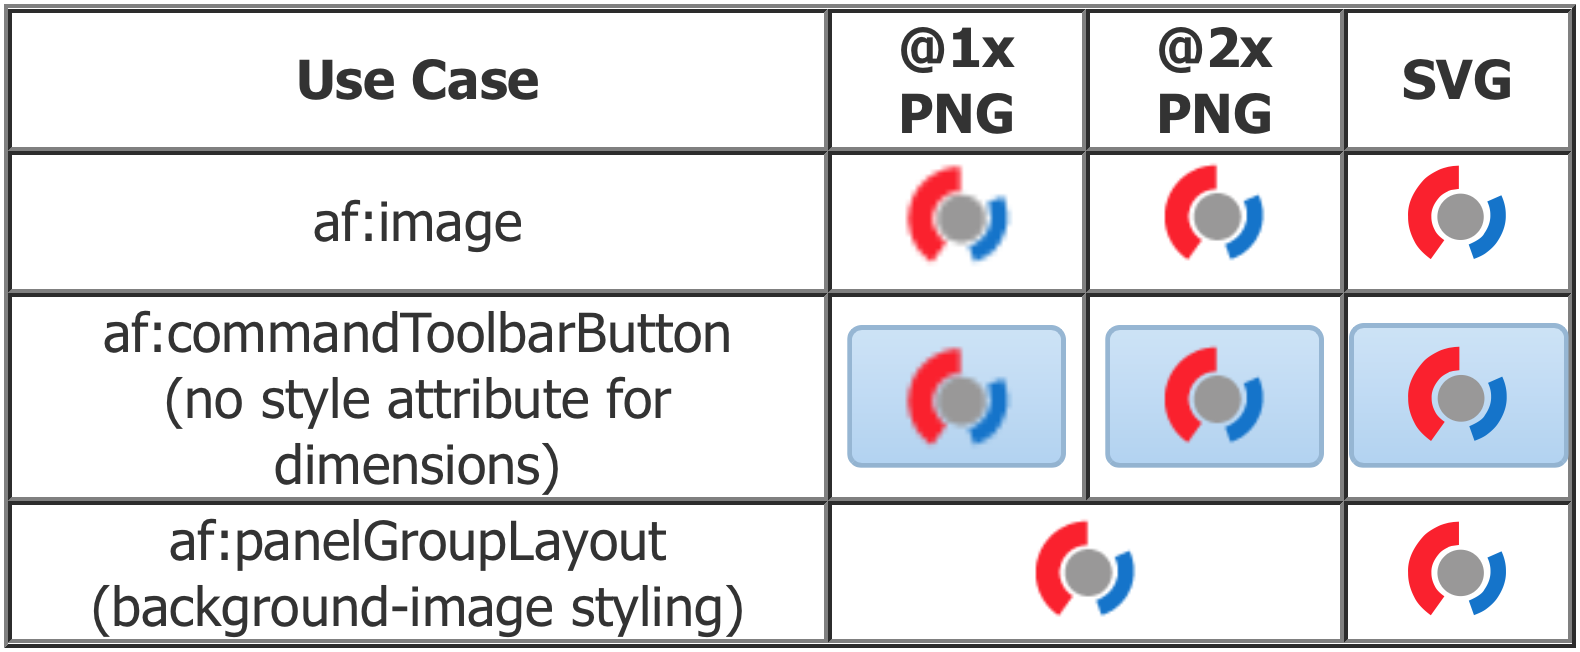
For all 3 use cases, simply use the .svg file as you have been accustomed to using for .png files. Just make sure the graphic was well-designed to look good on an @1x display if legacy support is important to you.
PNG (or other bitmap graphic)
For use case 1, you specify your image in the “source” attribute then the dimensions in the “inlineStyle” attribute.
For use case 2, you specify your image in the appropriate image attribute, e.g. “icon” and specify a marker “styleClass” that you’ll need to make a style block definition for (e.g. via an af:resource tag). This block will use that marker then space then “IMG” for its selector and then in the body of the block, specify the width and height.
For use case 3, you are dealing with CSS styles (e.g. in an af:resource). Since browser support is not universal, you will need to specify 3 kinds of selectors: (a) the default fallback for legacy browsers–where you define your @1x graphic, (b) the WebKit @2x override, (c) the modern @2x override. You can make additional blocks for @3x, @4x, etc. (You may optionally use this technique to hide/show specific component instances for use cases 1 & 2 too if you really want your app to display resolution-specific graphics.)
Sample code
<?xml version='1.0' encoding='UTF-8'?>
<jsp:root xmlns:jsp="http://java.sun.com/JSP/Page" version="2.1"
  xmlns:f="http://java.sun.com/jsf/core"
  xmlns:af="http://xmlns.oracle.com/adf/faces/rich"
  xmlns:trh="http://myfaces.apache.org/trinidad/html">
  <jsp:directive.page contentType="text/html;charset=UTF-8"/>
  <f:view>
    <af:document id="d1" title="Blurry Graphics" inlineStyle="padding:10px;">
      <f:facet name="metaContainer">
        <af:resource type="css">
          /* Dimensions for bitmap graphics on components that don't have
             style attributes for internal image elements. */
          .MyIconHolder IMG {
            width: 24px;
            height: 24px;
          }
          /* Example of background-image graphics */
          .MyBackgroundPNGImage {
            background-repeat: no-repeat;
            width: 24px;
            height: 24px;
            background-image: url(images/image@1x.png);
          }
          @media only screen and (-webkit-min-device-pixel-ratio: 2) {
            .MyBackgroundPNGImage {
              background-image: url('images/image@2x.png');
              -webkit-background-size: 24px 24px;
            }
          }
          @media only screen and (min-resolution: 2dppx) {
            .MyBackgroundPNGImage {
              background-image: url('images/image@2x.png');
              background-size: 24px 24px;
            }
          }
          .MyBackgroundSVGImage {
            background-repeat: no-repeat;
            width: 24px;
            height: 24px;
            background-image: url(images/image.svg);
          }
        </af:resource>
      </f:facet>
      <af:form id="f1">
        <trh:tableLayout id="tl1" borderWidth="1">
          <trh:rowLayout id="rl1">
            <trh:cellFormat id="cf1" header="true">
              <af:outputText id="ot1" value="Use Case"/>
            </trh:cellFormat>
            <trh:cellFormat id="cf2" header="true">
              <af:outputText id="ot2" value="@1x PNG"/>
            </trh:cellFormat>
            <trh:cellFormat id="cf3" header="true">
              <af:outputText id="ot3" value="@2x PNG"/>
            </trh:cellFormat>
            <trh:cellFormat id="cf4" header="true">
              <af:outputText id="ot4" value="SVG"/>
            </trh:cellFormat>
          </trh:rowLayout>
          <trh:rowLayout id="rl2">
            <trh:cellFormat id="cf5" halign="center">
              <af:outputText id="ot5" value="af:image"/>
            </trh:cellFormat>
            <trh:cellFormat id="cf6" halign="center">
              <af:image id="i1" source="/images/image@1x.png"/>
            </trh:cellFormat>
            <trh:cellFormat id="cf7" halign="center">
              <af:image id="i2" source="/images/image@2x.png"
                inlineStyle="width:24px;height:24px;"/>
            </trh:cellFormat>
            <trh:cellFormat id="cf8" halign="center">
              <af:image id="i3" source="/images/image.svg"/>
            </trh:cellFormat>
          </trh:rowLayout>
          <trh:rowLayout id="rl3">
            <trh:cellFormat id="cf9" halign="center">
              <af:panelGroupLayout id="pgl1" layout="vertical">
                <af:outputText id="ot6" value="af:commandToolbarButton"/>
                <af:outputText id="ot7" value="(no style attribute for dimensions)"/>
              </af:panelGroupLayout>
            </trh:cellFormat>
            <trh:cellFormat id="cf10" halign="center">
              <af:commandToolbarButton id="ctb1" icon="/images/image@1x.png"/>
            </trh:cellFormat>
            <trh:cellFormat id="cf11" halign="center">
              <af:commandToolbarButton id="ctb2" icon="/images/image@2x.png"
                styleClass="MyIconHolder"/>
            </trh:cellFormat>
            <trh:cellFormat id="cf12" halign="center">
              <af:commandToolbarButton id="ctb3" icon="/images/image.svg"/>
            </trh:cellFormat>
          </trh:rowLayout>
          <trh:rowLayout id="rl4">
            <trh:cellFormat id="cf13" halign="center">
              <af:panelGroupLayout id="pgl2" layout="vertical">
                <af:outputText id="ot8" value="af:panelGroupLayout"/>
                <af:outputText id="ot9" value="(background-image styling)"/>
              </af:panelGroupLayout>
            </trh:cellFormat>
            <trh:cellFormat id="cf14" halign="center" columnSpan="2">
              <af:panelGroupLayout id="pgl3" layout="vertical"
                styleClass="MyBackgroundPNGImage"/>
            </trh:cellFormat>
            <trh:cellFormat id="cf16" halign="center">
              <af:panelGroupLayout id="pgl4" layout="vertical"
                styleClass="MyBackgroundSVGImage"/>
            </trh:cellFormat>
          </trh:rowLayout>
        </trh:tableLayout>
      </af:form>
    </af:document>
  </f:view>
</jsp:root>
Accessing Managed Beans from Java
The following link shows a helpful article comparing alternate ways of using Java to programmatically retrieve an ADF Faces or JSF managed bean. In other words, this is how to evaluate EL in Java code.
iOS Web Inspector
The content of this post has been updated with additional detail at:
https://formattc.wordpress.com/2015/08/21/mobile-web-inspector-developer-tools/
Creating a panelGridLayout or tableLayout structure
It may be tempting to go crazy with panelGroupLayout components in ADF Faces and ADF Mobile. The panelGroupLayout is not the universal hammer. In many cases, you will have a simpler structure (easier to maintain, more predictable, faster performing, more flexible) if you build your structure using a panelGridLayout or tableLayout instead.

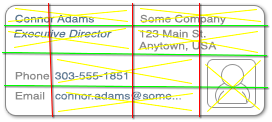
When you are given a mock-up of what the application should look like, you may not know how to break it down into something simple. Either print out the design on a piece of paper or open it up in a graphics program where you can draw some lines.
- Draw vertical lines representing potential column divisions (red)
- Draw horizontal lines for potential row divisions (green)
- Now that you have a basic grid structure, use a different color (yellow) to draw x marks where you see cells that need to span multiple columns or rows:

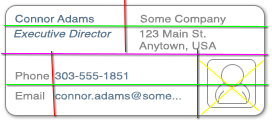
- You may find that your column lines really don’t make sense (in this case, the 2 middle columns had no cells in them that didn’t need to span into a nearby column. This is an indication that there probably ought to be 2 separate grids or tables. Use a new color (magenta) to draw a line where the division makes sense and repeat the process again:

Now you can go back to coding your gridRow/gridCell or rowLayout/cellFormat components because you can visually see where the content goes and where you need to use a special columnSpan or rowSpan. As an added bonus, you now have the ability to specify the sizes for your cells as well as the horizontal and vertical alignments of your cells–something panelGroupLayout would not allow you to control.
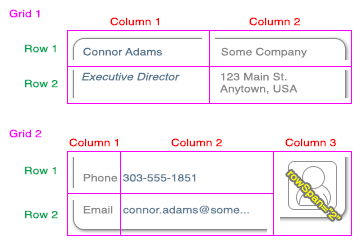
Notice that the labels and fields of grid 2 (columns 1 and 2) are showing separate components. This is done so that there can be matching horizontal alignment among the fields of the two rows. If these were input or select components, you would need to use simple=”true” (to hide the built-in label) and then use separate outputLabel components that reference them.
While we are only using consecutive grids in the example discussed in this article. You might come across a need to nest a grid inside of another grid. Do not excessively nest panelGridLayout nor tableLayout components (if you have 3 or more deep, consider a re-evaluation of your structure). You may find it helpful if someone else reviews your structure. Your goal should be to create something simple.
Mac JDeveloper – Show in Finder
Ever wanted to easily reveal a file that you’re working on in JDeveloper in the Mac OS X Finder?
Here’s how to set up a toolbar button and context menu item to do just that:
- Go to Tools – External Tools
- Click New…
- Choose these settings:
Type = External Program
Executable = open
Arguments = -R ${file.path}
Caption = Show in Finder
Add Item to Menus = Tools Menu, Window Context Menu, Source Editor Context Menu
Add Buttons to Toolbars = Main Toolbar
Log Output to Messages Log = unchecked
Enabled = When a file is selected or open in the editor
Once you’ve created that tool, simply right-click a file in the application navigator, right-click an editor, or use the toolbar button to switch to have JDeveloper automatically switch over to the Finder and open a window with that file selected.
