html
Adding Apple Watch to a MAF App
Here are some steps for adding iOS 9+ Apple Watch OS 2+ support to an Oracle Mobile Application Framework (MAF) App.
Set up and deploy the MAF app
1. Download and unzip the following Cordova plugin zip from git: https://github.com/leecrossley/cordova-plugin-apple-watch/archive/master.zip (more info at https://github.com/leecrossley/cordova-plugin-apple-watch)
2. Using JDeveloper, create a MAF app and select the unzipped plugin folder in the maf-application.xml (in the “Additional Plugins” section)
3. Create an AMX page (using amx:clientListener in amx:commandButtons to trigger the plugin APIs); this can be just placeholder content for now
4. Deploy the app to the simulator to generate an Xcode application in the JDev app’s “deploy” folder. We will be editing this generated output from the deploy folder so be careful to note that generated output will be lost if you re-deploy from JDev in the future.
5. Quit JDev
Prepare Xcode
6. Open the Xcode project from the MAF app’s deploy folder (Oracle_ADFmc_Container_Template.xcodeproj).
7. Create a new Target – WatchKit App (ensure “Notification Scene”, “Glance Scene”, and “Complication” are checked and activate the new scheme when prompted)
8. Open the Interface.storyboard from the newly-added target
Create the Watch App’s UI
9. Drag a Label from the Object Library onto the Interface Controller Scene’s Interface Controller and use the Attributes Inspector to style the label if desired (e.g. Size – Width and Height = Relative to Container and value 0.7)
Drag a Button from the Object Library onto the same scene below that Label.
10. From the watch extension folder in Xcode, open the InterfaceController.swift file in a new window or use the “ven diagram” (assistant editor) icon for split-screen editing.
11. While holding down the Control key, drag the label from the scene hierarchy that was added in step 9 into the class of step 10 to generate an Outlet variable:
@IBOutlet weak var helloWorldLabel: WKInterfaceLabel!
Repeat with the button to generate:
@IBOutlet weak var someButton: WKInterfaceButton!
and then also type in:
@IBAction func someButtonAction()
{
  print("someButtonAction")
}
Finally, Control-drag the hollow circle from the someButtonAction margin onto the button in the scene to connect the action to that button.
12. If you want to create a page-based app, drag additional Interface Controller scenes from the Object Library and connect them via Control-dragging the seque line from the selected scene to the new scene (and then in the seque panel, choose “next page” as the relationship)
Make live data to test
13. In the InterfaceController.swift file, add this temporary code to the end of the awakeWithContext method so we can verify the app functions before connecting it to the MAF app via the Cordova plugin:
// Create a timer to refresh the time every second
let timer = NSTimer.scheduledTimerWithTimeInterval(1.0, target: self, selector: #selector(InterfaceController.updateLabel), userInfo: nil, repeats: true)
 timer.fire()
14. Add this additional function to the class to support the temproary timer code:
func updateLabel()
{
  print("updateLabel")
  let time = NSDate()
  let formatter = NSDateFormatter()
  let timeZone = NSTimeZone(name: "UTC")
  formatter.timeZone = timeZone
  formatter.dateFormat = "h:mm:ss a"
  var formattedString = formatter.stringFromDate(time)
  formattedString = formattedString.stringByReplacingOccurrencesOfString(" p", withString: "PM", options: [], range: nil)
  formattedString = formattedString.stringByReplacingOccurrencesOfString(" a", withString: "AM", options: [], range: nil)
  self.helloWorldLabel?.setText("UTC \(formattedString)")
}
15. Run the WatchKit target to verify everything was created properly.
16. Stop the app in Xcode
Configure the Cordova Plugin APIs and, in turn, MMWormhole
17. Go to Oracle_ADFmc_Container_Template – all 3 targets: the phone, the Watch Target, and the Watch Extension Target – Capabilities – App Groups and turn it on. Ensure that all 3 checkmarks are checked. Your Xcode identity and Bundle Identifier must allow you to use app groups. This is a requirement of the MMWormhole framework (you’ll get an error and crash when running the app if you don’t do this). The “App Groups” must have an entry with a value that you will later use in your Swift code (step 23) and JavaScript code (step 25).
18. There is no need to manually add MMWormhole (https://github.com/mutualmobile/MMWormhole) to the Xcode project because the Cordova extension already has it included. However, you will need to select all of the MMWormhole*.m files in Xcode from the Plugins folder and then add (checkbox) target membership for the watch extension.
19. By default, the watch extension will not be able to see those MMWormhole Objective-C objects so you need to create a bridging header. Go to Oracle_ADFmc_Container_Template – Choose the Watch Target Extension – Build Settings – Swift Compiler Code Generation – Objective-C Bridging Header and specify the value:
Oracle_ADFmc_Container_Template/Plugins/Bridging-Header.h
20. In the Navigator, select the Plugins folder and choose File – New – File – Header File and name it Bridging-Header.h and choose the Watch Target Extension target and then use this as the file content:
#import "MMWormhole.h"
#import "MMWormholeSession.h"
21. In the watch extension InterfaceController.swift file, comment out the existing 2 lines for the timer in the awakeWithContext method (from step 13).
22. Add the following to the awakeWithContext method of the watch extension InterfaceController.swift file:
print("awakeWithContext")
let watchConnectivityListeningWormhole = MMWormholeSession.sharedListeningSession()
watchConnectivityListeningWormhole.activateSessionListening()
watchConnectivityListeningWormhole.listenForMessageWithIdentifier("from_phone_queue", listener:
{
  (messageObject) -> Void in
    if let message: AnyObject = messageObject
    {
      print("from_phone_queue")
      // handle your message here
      let messageValue: String! = message.objectForKey("selectionString") as! String
      self.helloWorldLabel?.setText("Phone \(messageValue)")
    }
})
23. Add this to the someButtonAction method of the watch extension InterfaceController.swift file:
// Make sure this appGroupId value is
// specified in the App Groups config from
// step #17
let appGroupId = "group.com.yourfoo.yourbar"
let wormhole = MMWormhole(applicationGroupIdentifier: appGroupId, optionalDirectory: nil, transitingType: .SessionContext)
let diceRoll = Int(arc4random_uniform(6) + 1) // 1 through 6
wormhole.passMessageObject("rolled \(diceRoll)", identifier: "from_watch_queue")
24. Clean then build to make sure the MMWormhole objects compile, otherwise the above steps need to be revisited.
25. Edit the app’s AMX page so that it has these components to interact with the Cordova plugin APIs:
<amx:verbatim id="v1">
<![CDATA[
window.handleMessageFromWatch = function(msg)
{
  console.log("handleMessageFromWatch");
  var outputTextElement =
    document.getElementById("ot2");
  if (!outputTextElement)
    console.log("Unable to find ot2");
  outputTextElement.textContent =
    "Watch " + msg;
};

window.handleAWInit = function(clientEvent)
{
  console.log("handleAWInit");
  var appGroupId = "group.com.yourfoo.yourbar";
  var queueName = "from_watch_queue";
  applewatch.init(
  function successHandler(appGroupId)
  {
    console.log("init Success", appGroupId);
  },
  function errorHandler(foo)
  {
    console.log("init Failure", foo);
  },
  appGroupId);

  applewatch.addListener(
    queueName,
    window.handleMessageFromWatch);
};

window.handleAWSendMessage = function(clientEvent)
{
  console.log("handleAWSendMessage");
  // The value of queueName must match a value
  // used in a corresponding listener in Swift
  // or Objective-C within the watch app using
  // the method
  // MMWormhole.listenForMessageWithIdentifier
  // in order for the watch to receive the
  // sent message.
  var diceRoll = // 1 through 6
    Math.floor(Math.random() * (7 - 1)) + 1;
  var message = "rolled " + diceRoll;
  var queueName = "from_phone_queue";
  applewatch.sendMessage(
    message,
    queueName,
    function successHandler(foo)
    {
      console.log("send Success", foo);
    },
    function errorHandler(foo)
    {
      console.log("send Failure", foo);
    });
};
]]>
</amx:verbatim>
<amx:commandButton id="cb1" text="Init">
  <amx:clientListener id="cl1" type="action"
    method="window.handleAWInit"/>
</amx:commandButton>
<amx:commandButton id="cb2" text="Send Message">
  <amx:clientListener id="cl2" type="action"
    method="window.handleAWSendMessage"/>
</amx:commandButton>
25. Run the app.
If you get an error about “The operation couldn’t be completed. (LaunchServicesError error 0.)” then look for the hidden error details in this file:
~/Library/Logs/CoreSimulator/CoreSimulator.log
In the phone app, click “Init” then “Send Message” to see a message appear in the label in the watch app. In the watch app, click the button to see a message appear in the phone app.
Final Notes
Remember that you are working in the deploy folder of JDeveloper so the next time you deploy, you’ll lose all your edits to the Xcode project. While this process involves editing files of the “deploy” folder of the MAF app, you’ll need to take careful notes on what changes you make in the deployed folder in case you need to re-deploy in the future (and you will need to) since that would require you to perform these steps again. Perhaps there is some way to bundle all the WatchKit content into a Cordova plugin so you could completely avoid having to mess around with the deploy folder (I have not researched this but if you have an have a blog post to share with detailed instructions, please let me know so I can add a link to it in this post).
A real app wouldn’t expose an “init” button to the user so you’d want to move that init call into a “showpagecomplete” handler like the one seen in the MAF developer guide. Typically a JavaScript feature include file would be where this code would go (just like the custom component code seen in the CompGallery public sample app).
HTML Layout Direction
Not every language uses a layout direction of left-to-right (LTR). Some use right-to-left (RTL). This is also known as the “reading direction” or “writing direction”.
At this time, browsers do not automatically apply dir=”ltr” nor dir=”rtl” to the HTML element for the appropriate layout direction. Adding this will change things like HTML tables re-ordering their cells horizontally and can be used in CSS files to apply alternative background images, flipped padding, margins, etc. using CSS selectors like this:
.foo {
  position: absolute;
  top: 10px;
}
html[dir=ltr] .foo {
  left: 10px;
}
html[dir=rtl] .foo {
  right: 10px;
}
There is no HTML5 API to to use the layout direction that comes from system settings. Strangely this HTML5 doc tells developers that they must manually add the direction even though in my opinion, the default should be that it comes from the system settings:
http://www.w3.org/International/questions/qa-html-dir
There is a dir=”auto” option:
http://www.w3.org/International/tests/repo/results/the-dir-attribute-auto#dirauto
but it has a few issues:
- Microsoft doesn’t support it.
- This is dependent on your page’s content instead of the system settings.
- This will prevent you from making CSS attribute selectors that resolve to “ltr” and “rtl” (it’ll be “auto” instead which defeats the purpose). There is a proposed CSS4 :dir(…) pseudo-class which would resolve auto to “ltr” and “rtl” but it is currently experimental and browser support is very weak.
Android 4.2 added support for right-to-left (RTL) layout:
http://android-developers.blogspot.com/2013/03/native-rtl-support-in-android-42.html
iOS also has its own mechanism for this:
https://developer.apple.com/library/ios/documentation/MacOSX/Conceptual/BPInternational/SupportingRight-To-LeftLanguages/SupportingRight-To-LeftLanguages.html
I was not able to find any Microsoft documentation that says whether UWP has anything equivalent to Android and iOS.
Unfortunately these disparate mechanisms are not abstracted into a unified, built-in Cordova API, the Cordova globalization plug-in, nor from what I can tell, any 3rd party plug-in.
This means you’ll either have to write your own Cordova plug-in using platform-specific code or alternatively add your own JavaScript code that uses the locale’s language code to determine whether you need to add dir=”ltr” or dir=”rtl” on your page’s HTML element.
Here is some sample JavaScript code to run when your page initially loads:
// Apply a "dir" attribute to the HTML element:
var bcp47Tag = ...; // e.g. "en-us", etc.
var scriptIndex = bcp47Tag.indexOf("-");
var language =
  bcp47Tag.substring(
    0,
    scriptIndex == -1 ? undefined : scriptIndex).toLowerCase();
if (language == "ar" || // Arabic
 language == "dv" || // Divehi
 language == "ha" || // Hausa
 language == "he" || // Hebrew
 language == "iw" || // Hebrew (legacy code)
 language == "ps" || // Pashto, Pushto
 language == "fa" || // Persian (Farsi)
 language == "ur" || // Urdu
 language == "ji" || // Yiddish (legacy code)
 language == "yi") // Yiddish
{
  document.documentElement.setAttribute("dir", "rtl");
}
else
{
  document.documentElement.setAttribute("dir", "ltr");
}
Mobile Web Inspector Developer Tools
What is a web inspector?
A web inspector is a developer tool that allows you to debug JavaScript, CSS, and HTML. You’ll usually get a file resource browser, performance monitoring tools, the ability to set code breakpoints (although in my experience breakpoints are somewhat flaky depending on which version of the mobile OS and desktop browser you are using–so often I resort to using the JavaScript “debugger” keyword to act like a breakpoint), the ability to edit HTML, and a tool for visualizing, resolving, and changing style properties–all without having to redeploy your application.
Apple introduced the ability to use the desktop Safari web inspector developer tools with iOS application WebViews and mobile Safari back in iOS 6 and Safari 6. Each new release of iOS has required that you use a corresponding version of desktop Safari so beware of this if you are planning to upgrade one device but not the other.
Google introduced the ability to use the desktop Chrome web inspector developer tools with Android application WebViews and mobile Chrome in Android 4.4 when the Chrome WebView was introduced. Many legacy Android devices are still being sold (let alone in use) but unfortunately, it is not compatible with the web inspector. For situations like that, there are some third party techniques available that require you to inject code into your application in order to send messages back and forth with a server. Those solutions have much fewer abilities than a formal web inspector. To combat this legacy issue, Google introduced a Google Play-updatable WebView in Android 5 Lollipop so your application can take advantage of new technologies even if the OS is not upgradeable.
Regardless of the platform, it is important to note that the WebView and the mobile browser are not equal. If something works in the browser, you cannot always expect it to work exactly the same way in the WebView. For example, on Android, I have seen as much as a major version number difference of 3 between the two. On iOS (prior to WKWebView), JavaScript performance was severely throttled compared to what mobile Safari had.
This post only discusses web inspectors. If you are interested in debugging Java code for your application, refer to the Oracle MAF developer guide for instructions.
Setting up your Oracle MAF Application
For iOS, there is no property to edit, you either need to use a debug deployment or use Xcode to run the application. For Android, you must edit the src/META-INF/maf.properties file of your application so that it defines:
javascript.debug.enabled=true
You can only use a web inspector with development (aka non-production) applications.
If you want to connect the web inspector before the first screen loads, will need to edit your run configuration’s “Application Arguments” to specify the following which allows you to configure how many seconds before the WebView will get populated with content.
-featureContentDelay 20
If doing this in an already-generated Xcode project, this setting goes in the Run Scheme’s “Arguments Pass On Launch” field.
Setting up your Desktop Browser
I assume that you already have your device set up for development so I won’t cover it here (e.g. Android needs development mode and USB debugging turned on via tapping the build number 7 times, iOS needs the device set up as “Use for development”, etc.).
Desktop Chrome doesn’t require anything special but I use this optional “ADB” Chrome extension as a convenience since I find it easier to click an icon vs. typing a special URL in the address bar.
Desktop Safari requires you to enable the “Develop” menu in its Advanced Preferences dialog:

Using the Safari Web Inspector
From the Safari Develop menu, your connected devices and iOS Simulator will display as submenus. Each submenu will list all of the WebViews that you are allowed to inspect (if you are not sure which one you want, a light blue highlight will appear on your device or in the simulator as you hover over each menu item).

A web inspector window will open once you select that menu item:
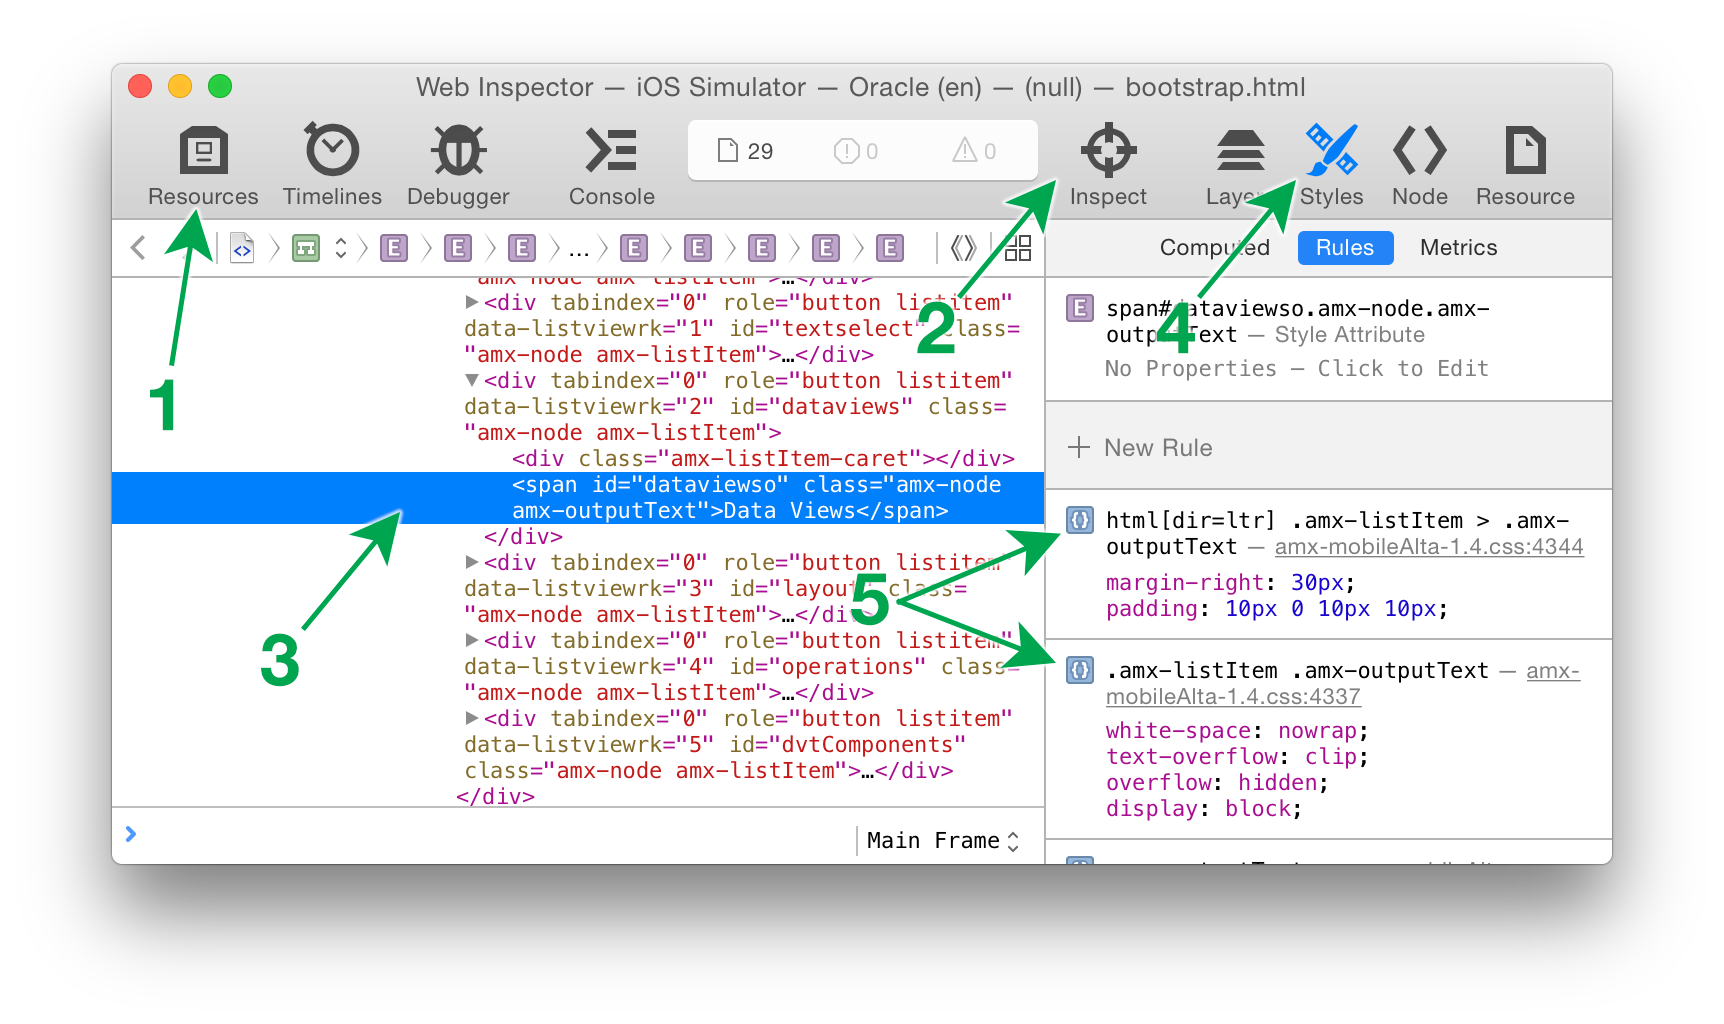
The UI varies across versions of desktop Safari but I’ll describe one here as an example. The “Resources” tab (1) is where you can browse the DOM, look at scripts, style sheets, etc. When the HTML resource is selected, the main panel will show you the DOM tree (3) which you can manually browse for an element. Alternatively, you can use the crosshairs tool (2) to click on the screen (of the actual device or the simulator) to pick an element that you want to inspect.
With an element selected, you can then use the “Styles” tab (4) of the right panel to view the element’s style properties. This will show you the exact selectors that are providing each style to the inspected element (5). This is incredibly valuable, particularly when multiple selectors are competing (a line will strike out any styles that lose out due to some other more specific selector). You can also edit those values directly or add additional properties and see the change immediately take effect on the screen. Beware changes made in the inspector do not get saved permanently into your application. If you are trying to create a custom style sheet, you’ll need to jot down elsewhere the changes you’ve made; if you leave the page or close the app, you’ll lose your changes.
Using the Chrome Web Inspector
First, visit Chrome’s “chrome://inspect/#devices” page to see a list of your connected and debuggable Android devices. Each will appear with all of the WebViews that you are able to inspect. An icon will appear with a darker gray and the WebView listed towards the top will be what is currently visible on the Android screen.
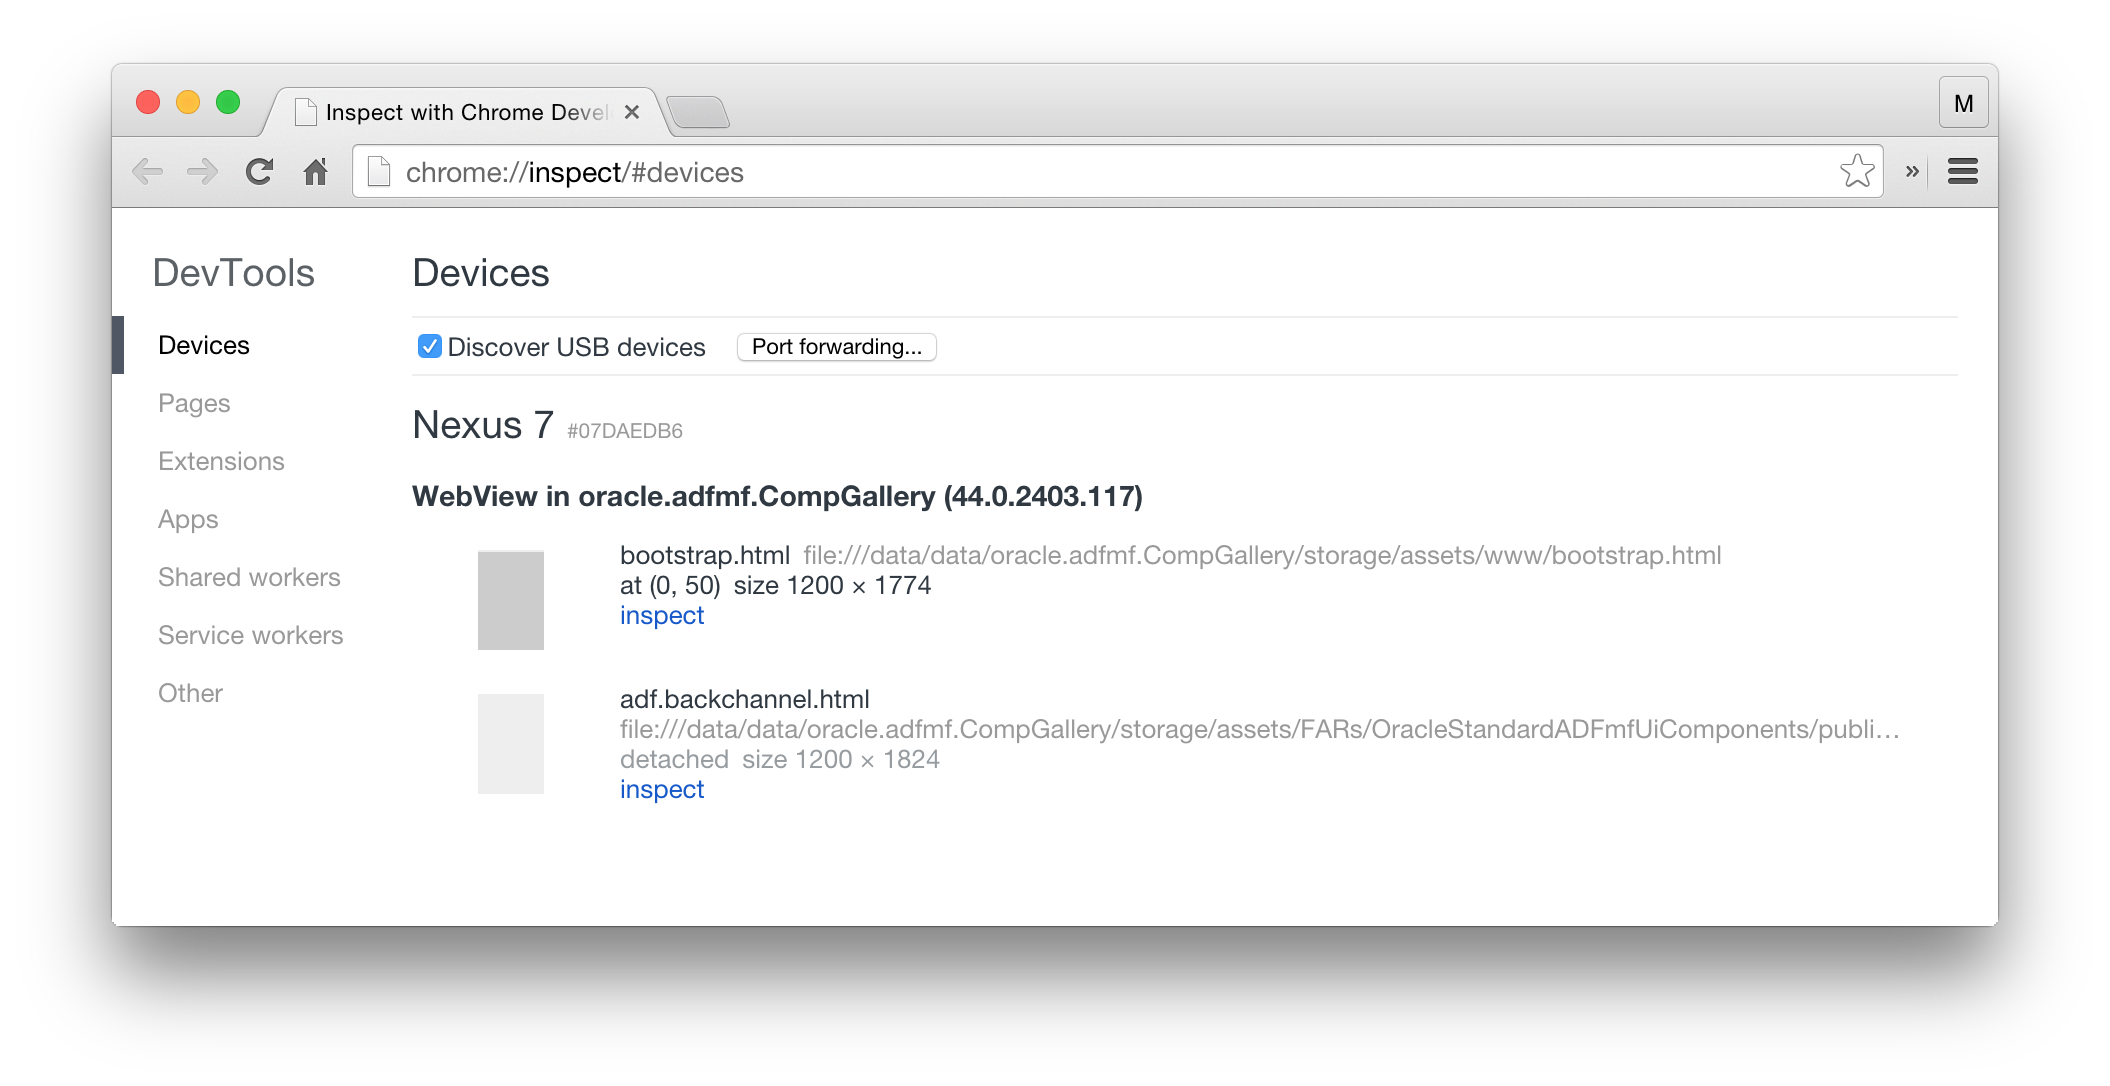
A web inspector will open once you click the “inspect” link.
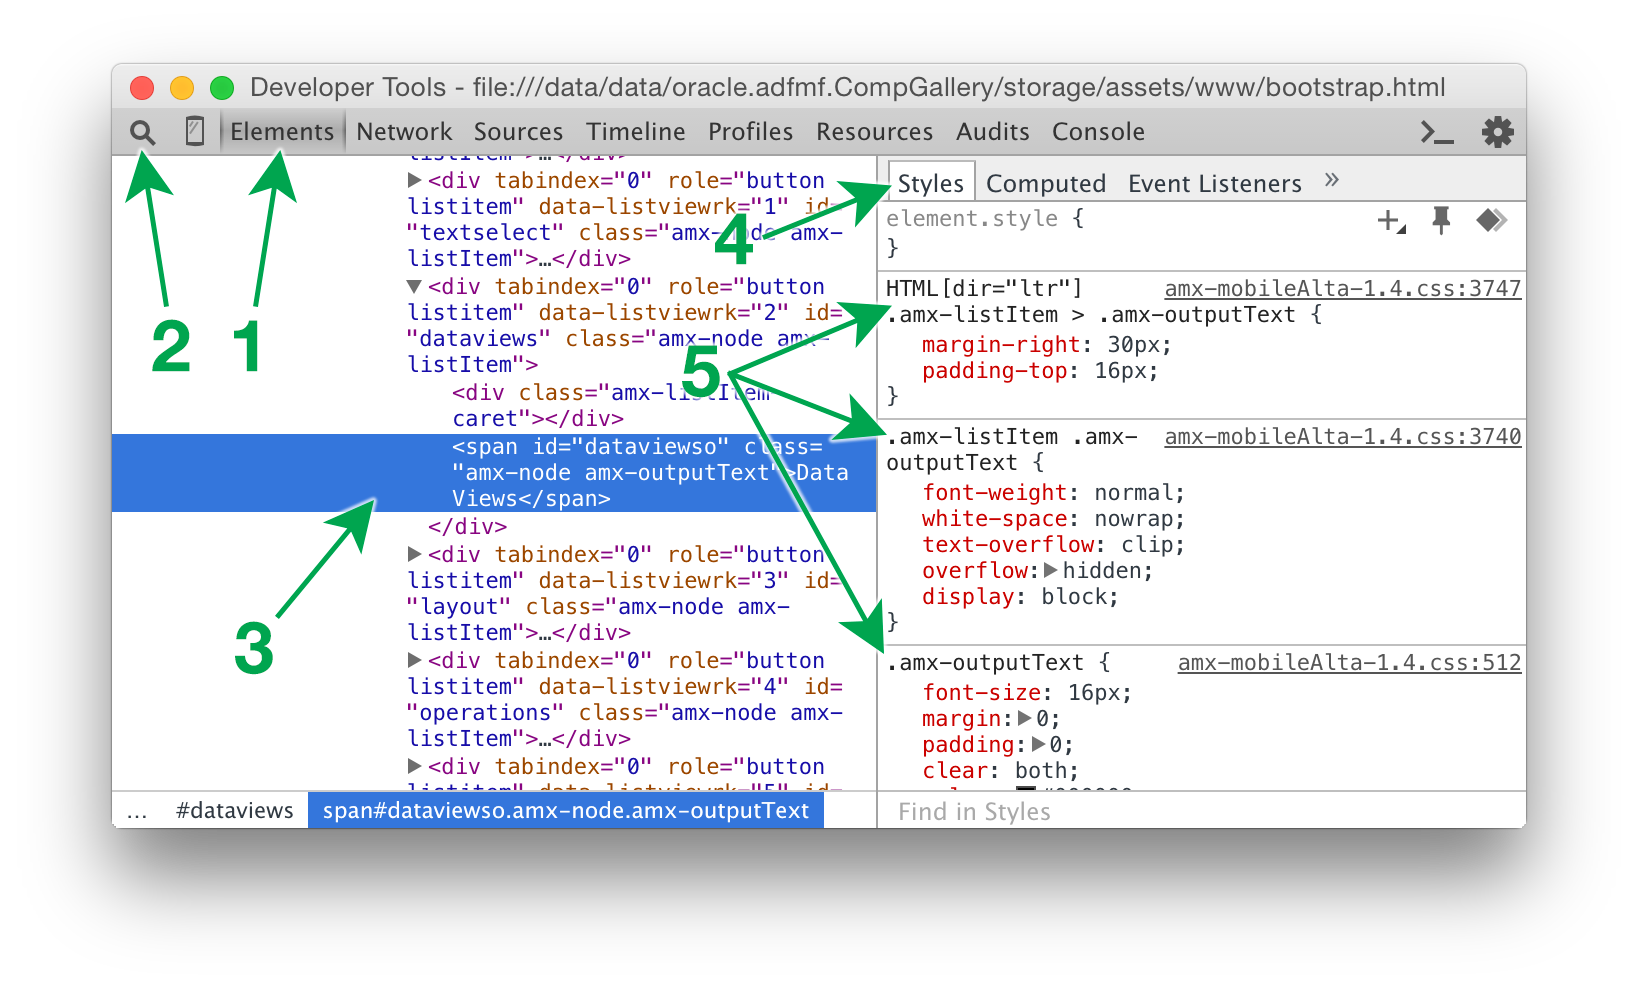
The UI varies across versions of desktop Chrome but I’ll describe one here as an example. The “Elements” tab (1) is where you can browse the DOM. The main panel will show you the DOM tree (3) which you can manually browse for an element. Alternatively, you can use the magnifying glass tool (2) to click on the screen (of the actual device or the emulator) to pick an element that you want to inspect.
With an element selected, you can then use the “Styles” tab (4) of the right panel to view the element’s style properties. This will show you the exact selectors that are providing each style to the inspected element (5). This is incredibly valuable, particularly when multiple selectors are competing (a line will strike out any styles that lose due to some other more specific selector). You can also edit those values directly or add additional properties and see the change immediately take effect on the screen. Beware changes made in the inspector do not get saved permanently into your application. If you are trying to create a custom style sheet, you’ll need to jot down elsewhere the changes you’ve made; if you leave the page or close the app, you’ll lose your changes.
Further Reading
https://github.com/phonegap/phonegap/wiki/Debugging-in-PhoneGap
Blurry Graphics in ADF Faces
Ever since Apple introduced the Retina Display in 2010, modern devices have changed to display content at twice (@2x), three times (@3x), four times (@4x) [or even fractions in-between] the resolution that we have been used to in the past.
For app developers using bitmap graphics, this can be a bit of a nightmare to support. You have to generate graphics at multiple resolutions and change your application to reference different sizes of graphics. Unless you are using photographic content, you may find it easier to deal with SVG (vector graphic) images instead.
In ADF Faces applications, there are at least 3 categories of ways to display images:
- Image components
- Components that have an image somewhere inside of it (and that don’t offer a style attribute explicitly for that image)
- CSS background-image styles
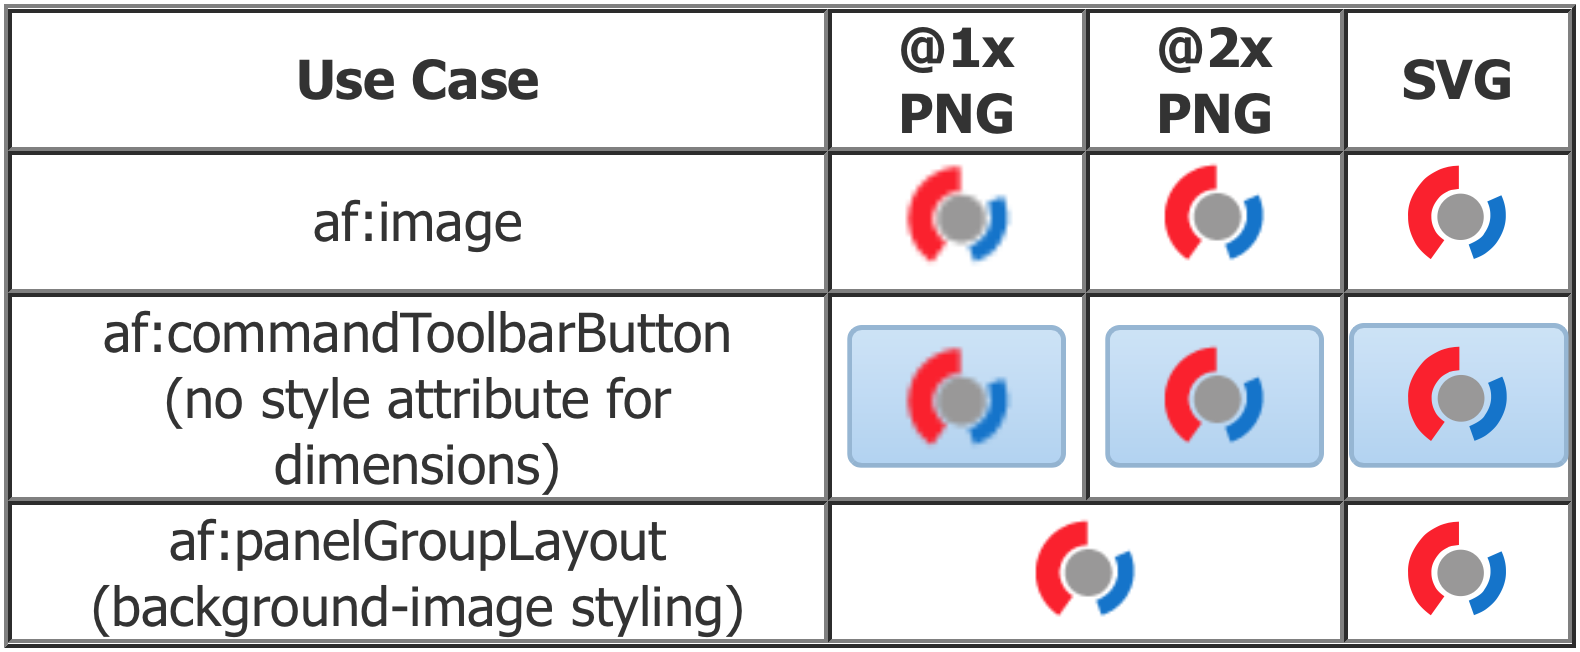
SVG
For all 3 use cases, simply use the .svg file as you have been accustomed to using for .png files. Just make sure the graphic was well-designed to look good on an @1x display if legacy support is important to you.
PNG (or other bitmap graphic)
For use case 1, you specify your image in the “source” attribute then the dimensions in the “inlineStyle” attribute.
For use case 2, you specify your image in the appropriate image attribute, e.g. “icon” and specify a marker “styleClass” that you’ll need to make a style block definition for (e.g. via an af:resource tag). This block will use that marker then space then “IMG” for its selector and then in the body of the block, specify the width and height.
For use case 3, you are dealing with CSS styles (e.g. in an af:resource). Since browser support is not universal, you will need to specify 3 kinds of selectors: (a) the default fallback for legacy browsers–where you define your @1x graphic, (b) the WebKit @2x override, (c) the modern @2x override. You can make additional blocks for @3x, @4x, etc. (You may optionally use this technique to hide/show specific component instances for use cases 1 & 2 too if you really want your app to display resolution-specific graphics.)
Sample code
<?xml version='1.0' encoding='UTF-8'?>
<jsp:root xmlns:jsp="http://java.sun.com/JSP/Page" version="2.1"
  xmlns:f="http://java.sun.com/jsf/core"
  xmlns:af="http://xmlns.oracle.com/adf/faces/rich"
  xmlns:trh="http://myfaces.apache.org/trinidad/html">
  <jsp:directive.page contentType="text/html;charset=UTF-8"/>
  <f:view>
    <af:document id="d1" title="Blurry Graphics" inlineStyle="padding:10px;">
      <f:facet name="metaContainer">
        <af:resource type="css">
          /* Dimensions for bitmap graphics on components that don't have
             style attributes for internal image elements. */
          .MyIconHolder IMG {
            width: 24px;
            height: 24px;
          }
          /* Example of background-image graphics */
          .MyBackgroundPNGImage {
            background-repeat: no-repeat;
            width: 24px;
            height: 24px;
            background-image: url(images/image@1x.png);
          }
          @media only screen and (-webkit-min-device-pixel-ratio: 2) {
            .MyBackgroundPNGImage {
              background-image: url('images/image@2x.png');
              -webkit-background-size: 24px 24px;
            }
          }
          @media only screen and (min-resolution: 2dppx) {
            .MyBackgroundPNGImage {
              background-image: url('images/image@2x.png');
              background-size: 24px 24px;
            }
          }
          .MyBackgroundSVGImage {
            background-repeat: no-repeat;
            width: 24px;
            height: 24px;
            background-image: url(images/image.svg);
          }
        </af:resource>
      </f:facet>
      <af:form id="f1">
        <trh:tableLayout id="tl1" borderWidth="1">
          <trh:rowLayout id="rl1">
            <trh:cellFormat id="cf1" header="true">
              <af:outputText id="ot1" value="Use Case"/>
            </trh:cellFormat>
            <trh:cellFormat id="cf2" header="true">
              <af:outputText id="ot2" value="@1x PNG"/>
            </trh:cellFormat>
            <trh:cellFormat id="cf3" header="true">
              <af:outputText id="ot3" value="@2x PNG"/>
            </trh:cellFormat>
            <trh:cellFormat id="cf4" header="true">
              <af:outputText id="ot4" value="SVG"/>
            </trh:cellFormat>
          </trh:rowLayout>
          <trh:rowLayout id="rl2">
            <trh:cellFormat id="cf5" halign="center">
              <af:outputText id="ot5" value="af:image"/>
            </trh:cellFormat>
            <trh:cellFormat id="cf6" halign="center">
              <af:image id="i1" source="/images/image@1x.png"/>
            </trh:cellFormat>
            <trh:cellFormat id="cf7" halign="center">
              <af:image id="i2" source="/images/image@2x.png"
                inlineStyle="width:24px;height:24px;"/>
            </trh:cellFormat>
            <trh:cellFormat id="cf8" halign="center">
              <af:image id="i3" source="/images/image.svg"/>
            </trh:cellFormat>
          </trh:rowLayout>
          <trh:rowLayout id="rl3">
            <trh:cellFormat id="cf9" halign="center">
              <af:panelGroupLayout id="pgl1" layout="vertical">
                <af:outputText id="ot6" value="af:commandToolbarButton"/>
                <af:outputText id="ot7" value="(no style attribute for dimensions)"/>
              </af:panelGroupLayout>
            </trh:cellFormat>
            <trh:cellFormat id="cf10" halign="center">
              <af:commandToolbarButton id="ctb1" icon="/images/image@1x.png"/>
            </trh:cellFormat>
            <trh:cellFormat id="cf11" halign="center">
              <af:commandToolbarButton id="ctb2" icon="/images/image@2x.png"
                styleClass="MyIconHolder"/>
            </trh:cellFormat>
            <trh:cellFormat id="cf12" halign="center">
              <af:commandToolbarButton id="ctb3" icon="/images/image.svg"/>
            </trh:cellFormat>
          </trh:rowLayout>
          <trh:rowLayout id="rl4">
            <trh:cellFormat id="cf13" halign="center">
              <af:panelGroupLayout id="pgl2" layout="vertical">
                <af:outputText id="ot8" value="af:panelGroupLayout"/>
                <af:outputText id="ot9" value="(background-image styling)"/>
              </af:panelGroupLayout>
            </trh:cellFormat>
            <trh:cellFormat id="cf14" halign="center" columnSpan="2">
              <af:panelGroupLayout id="pgl3" layout="vertical"
                styleClass="MyBackgroundPNGImage"/>
            </trh:cellFormat>
            <trh:cellFormat id="cf16" halign="center">
              <af:panelGroupLayout id="pgl4" layout="vertical"
                styleClass="MyBackgroundSVGImage"/>
            </trh:cellFormat>
          </trh:rowLayout>
        </trh:tableLayout>
      </af:form>
    </af:document>
  </f:view>
</jsp:root>
iOS Web Inspector
The content of this post has been updated with additional detail at:
https://formattc.wordpress.com/2015/08/21/mobile-web-inspector-developer-tools/
CSS Shorthand Tokens
In CSS, you will come across some shorthand notation for the margin, border-color, border-style, border-width, and padding properties. It isn’t obvious or easy to remember which token in the value applies to which side of the element so here’s a handy list of the 4 possible varieties:
- One token — all-sides-use-the-same-value
- Two tokens — top-and-bottom right-and-left
- Three tokens — top right-and-left bottom
- Four tokens — top right bottom left
At least the four-token example can be remembered by associating the element with a clock where time progresses clockwise.
HiDPI Images in MAF or ADF Mobile Applications
Whether you are developing a MAF (or ADF Mobile) application or a classic ADF Faces application, it is becoming more and more important to support HiDPI screens (high resolution or “retina” displays). There is no easier way to make your application look out-dated than to use grainy, unprofessional image assets or use them improperly.
In HTML, the “px” unit (sometimes referred to as a “dp” or density-independent pixel) corresponds to the same amount of space regardless of the DPI of your screen (however, the number of screen pixels may vary). The original iPhone models did not have HiDPI displays. Each point of color on those screens corresponds to one HTML CSS “px” unit. Newer iPhone models introduced a HiDPI (or “retina”) display that has 4 screen pixels in the same amount of space that 1 screen pixel used to take up (2 screen pixels wide by 2 screen pixels tall); on these new screens, the width and height “px” values use twice the amount of screen pixels.
Why is this a common problem? Since MAF (or ADF Mobile) uses HTML, displaying an image is not as simple as just specifying the source path and magically hoping the browser will know that you are using a high resolution image. You must specify dimensions to go along with the source path.
Let’s work with an example. You have an image named “image-64.png”. This image has a size of 64 by 64 individual dots of color (individual points of color information). If you coded your page like the following, the image will be shown with a width of 64px and a height of 64px (one color dot per “px”):
<amx:image id="i1" source="images/image-64.png"/>
This would look just fine on a classic low-DPI display. However, on a HiDPI display, it still takes up the same space but since there are more screen pixels, the image will look very grainy.
In order to look crisp and professional, you need to set a size so that each dot of color corresponds to at least one screen pixel. For a HiDPI display, this means your image needs a width and a height specified such that you use 2 dots of image color information per HTML CSS “px” unit (e.g. a 64 by 64 sized image should be specified to use a width of 32px and a height of 32px. In code, your page should look like this:
<amx:image id="i1" inlineStyle="width:32px;height:32px" source="images/image-64.png"/>
Even if you still want to support legacy screens for your application, this same image (with the same specified width and height) will look beautiful on low-DPI screens because of how images are processed modern browsers.
If for some reason you really needed or wanted to specify alternate images for each kind of screen, you have the option to use a screen properties EL variable to toggle the rendered state of alternate amx:image components or simply use that EL to alter the inlineStyle and the source path as desired.
PNG vs. SVG?
Consider whether using PNG is really the right choice to begin with. SVG (scalable vector graphics) files tend to be smaller file sizes when created without excessive anchor points, no embedded bitmap data, reduced decimal number precision, excess whitespace removed, and comments removed. If the resolution of your display gets better, the SVG will look that much better; you don’t need multiple resolution versions of the same image resources. If the SVG was given the proper width/height to begin with by its creator, you won’t even need to muck with inlineStyles since the image will naturally be displayed at the proper size.
Browsers and the HTML accessKey
Background
As browsers evolve, changes have been made with how the HTML “accessKey” attribute works. There are differences across platforms for the same browser version as well as differences across browser versions on the same platform. There are even some cases where the exact same browser treats accessKey differently for button elements vs. anchor elements! This post shows some examples of how to invoke the accessKey and what the behavior is.
Sample button and anchor HTML using the “accessKey” attribute
<html>
<body>
<button onclick="javascript:alert('hi button with onclick')"
        accessKey="r">Button t<u style="color:red">r</u>y me</button>
<a href="javascript:;" onclick="alert('hi anchor with onclick');return false;"
        accessKey="o">Anchor with <b style="color:red">o</b>nclick</a>
</body>
</html>
How different browsers handle the above accessKey letters for button and anchor elements
| Browser | Operating System | Key Combination | Button Behavior | Anchor Behavior |
|---|---|---|---|---|
| Chrome 7.0.517.41 | Linux | Alt + letter | Clicks the button (3) | Clicks the anchor (3) |
| Chrome 7.0.517.41 | Mac OS X | Control + Option + letter | Clicks the button (3) | Clicks the anchor (3) |
| Chrome 7.0.517.41 | Windows | Alt + letter | Clicks the button (3) | Clicks the anchor (3) |
| Firefox 1.5 | Windows | Alt + letter | Clicks the button (1) | Unknown |
| Firefox 2 | Linux | Alt + Shift + letter | Clicks the button (1) | Clicks the anchor |
| Firefox 2 | Mac OS X | Control + letter | Clicks the button (1) | Clicks the anchor |
| Firefox 2 | Windows | Alt + Shift + letter | Clicks the button (1) | Unknown |
| Firefox 3 | Linux | Alt + Shift + letter | Clicks the button (1) | Clicks the anchor |
| Firefox 3 | Mac OS X | Control + letter | Clicks the button (1) | Clicks the anchor |
| Firefox 3 | Windows | Alt + Shift + letter | Clicks the button (1) | Clicks the anchor |
| Internet Explorer 6 | Windows | Alt + letter | Sets focus on the button (2) | Unknown |
| Internet Explorer 7 | Windows | Alt + letter | Sets focus on the button (2) | Sets focus on the anchor (2) |
| Internet Explorer 8 | Windows | Alt + letter | Clicks the button (3) | Sets focus on the anchor (2) |
| Internet Explorer 9 (beta) | Windows | Alt + letter | Clicks the button (3) | Sets focus on the anchor (2) |
| Safari 3.1.2 | Mac OS X | Control + Option + letter | Clicks the button (3) | Clicks the anchor (3) |
| Safari 3.1.2 | Windows | Alt + letter | Clicks the button (3) | Clicks the anchor (3) |
| Safari 5.0.2 | Mac OS X | Control + Option + letter | Clicks the button (3) | Clicks the anchor (3) |
| Safari 5.0.2 | Windows | Alt + letter | Clicks the button (3) | Clicks the anchor (3) |
- Red = Different behavior for buttons and anchors
- Comment 1 = To just set focus on the button/anchor, change your about:config setting for the “accessibility.accesskeycausesactivation” user preference.
- Comment 2 = Press Enter to click the button/anchor
- Comment 3 = There appears to be no built-in mechanism to just set focus on the button/anchor. The component handling the click event would be responsible for setting focus while handling the click.
One-off ADF component skin appearance
Have you ever wanted to make an ADF Faces Rich Client component have a unique appearance but not change all other instances of that component? You can as long as the things you want to change are not skin properties or skin icons (server-side aspects like properties and icons are not part of the client-side generated style sheet so this client-side solution will not allow you to change them).
Let’s start with an interactive example; the skinning demo pages for the ADF Faces Rich Client:
http://jdevadf.oracle.com/adf-richclient-demo/components/skinningKeys/inputText.jspx
On this page, there is a right-hand side where you can see some example inputText components. When you click on the checkboxes on the left-hand side of this page, the appearance of those start to change. However, the inputText for the find field at the top of the page does not change. This is because of some containment selector definitions in the skin used on this page that confines the custom styling to instances of the inputText that are contained in another component that has a particular style class. Since the find field is not inside of that container, these custom styles do not apply to that field.
Let’s say your page has a structure like this:
<af:panelGroupLayout id="pgl1" layout="scroll" styleClass="SpecialMarker">
  <af:inputText id="it1" label="Name"/>
</af:panelGroupLayout>
To style that inputText specially in this container, you would create skinning definitions like this:
.SpecialMarker af|inputText {background-color:pink}
.SpecialMarker af|inputText::access-key {color: aqua;}
.SpecialMarker af|inputText::content {background-color:red}
.SpecialMarker af|inputText::label {font-weight: bold}
Alternatively, you could put your marker directly on the inputText like this:
<af:inputText id="it1" label="Name" styleClass="SpecialMarker"/>
and have skinning definitions like this:
af|inputText.SpecialMarker {background-color:pink}
af|inputText.SpecialMarker af|inputText::access-key {color: aqua;}
af|inputText.SpecialMarker af|inputText::content {background-color:red}
af|inputText.SpecialMarker af|inputText::label {font-weight: bold}
Deploying your application to a reserved port number
Ensure that you avoid reserved port numbers when deploying your application. Some application servers will fail to prevent you from deploying your application on a reserved server port (e.g. 1, 7, 9, 11, 13, 15, 17, 19, 20, 21, 22, 23, 25, 37, 42, 43, 53, 77, 79, 87, 95, 101, 102, 103, 104, 109, 110, 111, 113, 115, 117, 119, 123, 135, 139, 143, 179, 389, 465, 512, 513, 514, 515, 526, 530, 531, 532, 540, 556, 563, 587, 601, 636, 993, 995, 2049, 3659, 4045, 6000, 6665, 6666, 6667, 6668, 6669). If you use one of these reserved ports, some web browsers may honor it but at least WebKit-based browsers (e.g. Safari and Google Chrome) will not. You may see some page content but all resources (images and styles) will fail to load.
